
What is Workflow?
Workflow is basically used to automate or customize the business process. The business process involves transaction approval, lead nurturing, and record management.
The Workflow is usually created for a specific record type and it contains multiple stages or states of a record as it moves forward through the business process.
In each state of Workflow, we define the action to be performed through Workflow like setting values, performing any logic before setting values to fields, sending emails, adding or removing buttons, and so on.
Depending on the conditions we define in the Workflow, the flow can move to different states or transitions.
To create, view or edit the Workflow the user requires various permissions to work with the standard records. For accessing all the Workflow functionality, we need to use the administrator permissions.
We have an interface to create, view and edit the Workflows which is known as Workflow Manager Interface.
Triggers are the heart of Workflow. Triggers are nothing but the events which occur when the record is viewed, edited or created.
How to Enable Workflow/Suiteflow in your account?
To enable Workflow in your account, you must be logged in as an administrator role.
- Go to Setup > Company > Setup Tasks > Enable Features.
- Click the SuiteCloud tab.
- Under SuiteFlow, flag the SuiteFlow checkbox.
- Click Save.
What is Workflow Manager Interface?
Workflow Manager Interface is a simple drag-and-drop area where we create, edit and view the Workflows.

There are two elements present in the Workflow Manager Interface.
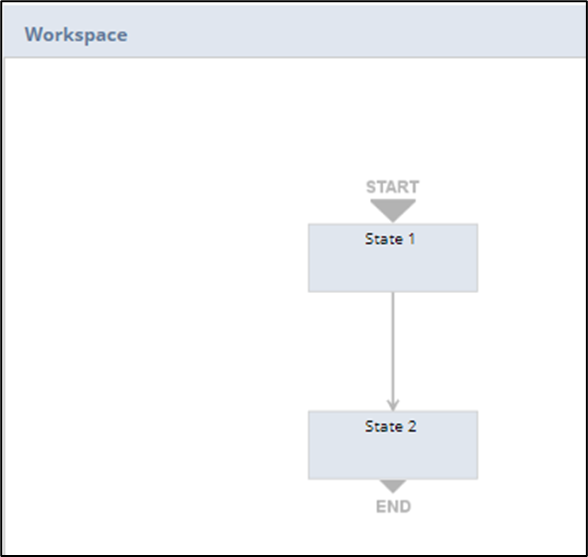
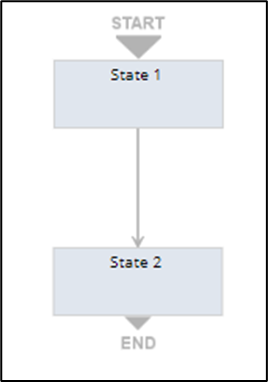
1. Diagrammer: In edit mode, the diagrammer is used to add and edit states and transitions. In view mode, the diagrammer is used to view Workflow states, actions and transitions. Below is the screenshot of Workflow Diagrammer.
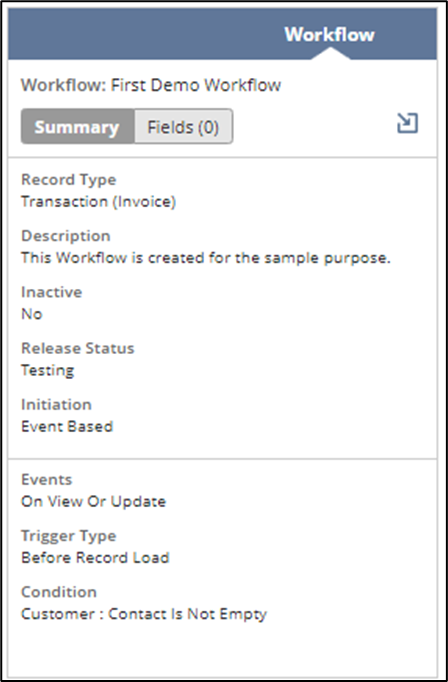
2. Context Panel: In edit mode, the context panel is used to add, edit and delete Workflow elements. In view mode, the context panel is used to view Workflow element information. Below is the screenshot of Workflow Context Panel.
Workflow Elements
Below is the list of Workflow Elements.
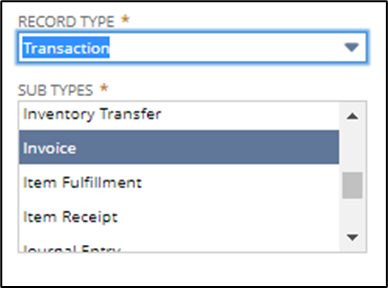
1. Base Record: The base record is nothing but the type of record for which you are creating the Workflow. The record types can be transaction records (which contain subtypes such as Sales order, Invoices, and so on.), Customer records, Employee records, Task records, Custom records, and many more.
2. States: States are nothing but the Stages which we define in the Workflow for applying the custom business logic.
3. Triggers: Triggers are the events that occur when user performs some action on record like it is viewed, edited, or created.
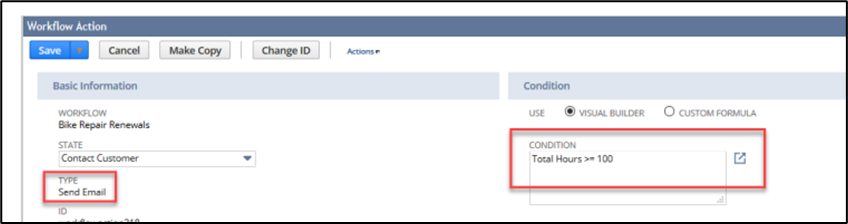
4. Actions: Actions are the task that we define in the Workflow which executes based on a condition. If an action has a condition associated with it, the action executes only if the condition is met. The conditions can be created by using the condition builder or by using custom formulas.
5. Conditions: Whenever a condition is met the Workflow will execute. The conditions are defined by the Workflow creators.
6. Transitions: A transition moves the record in the Workflow into another state. A state can contain multiple transitions, with each transition having its own condition. A Workflow instance executes the first transition that meets the transition condition and the record in the Workflow moves to the specified state.
7. Custom Fields: Custom fields are variables that you can use in Workflows. Use custom fields to collect and track data for a Workflow instance or a state in a Workflow. Each type of custom field is defined by the scope of the field within the Workflow.
8. Workflow Revision: Workflow revisions begin after a Workflow is created. When a Workflow is created, its initial revision number is 1. The addition of a state is considered to be revision 2. The two simultaneous creation events cause the Workflow revision to be listed as 2. Subsequent changes increase the revision number by 1. For example, adding a custom Workflow field or adding an action would each increase the revision number by 1. Any change made to a Workflow's definition or any of its children also increases its revision number.
Creating your First Workflow:
To create a Workflow, navigate to Customization > Workflow > Workflows > New
When you follow the above steps then the screen below will open where you need to enter the necessary information.
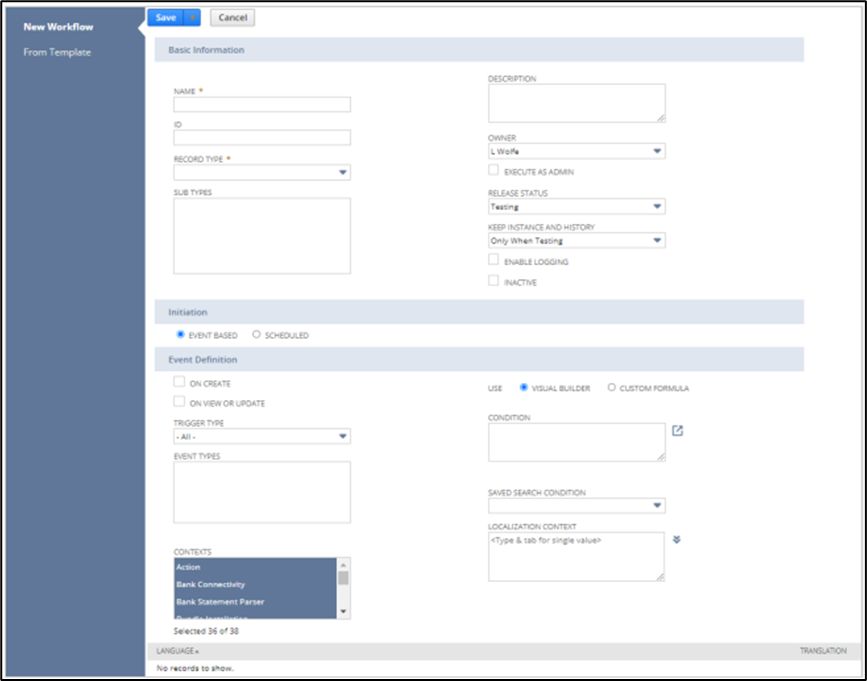
- Basic Information:
- Name: It’s a user-defined name given to the Workflow which can be used to better describe the Workflow purpose. And can be used in the future to find that Workflow from the list easily.
- Id: Id is a unique id that is given to the Workflow. The best practice is to always start the id with an underscore. Ex- _setvalue_on_invoice_record
- Description: Description is the optional field that is used to describe the Workflow in more detail.
- Owner: Sets the owner of the Workflow. By default, the owner is set to the currently logged-in user. Once a Workflow is saved, only the owner of the Workflow and a NetSuite administrator can modify the owner field.
- Record Type: Select the record type you want to associate with the Workflow. Once you have saved the Workflow, you cannot change the record type. Note that if you select Customer, Item, or Transaction, a list of sub-record types appears in the Sub Types field.
- Execute as Admin: Check this checkbox if you want to execute the Workflow with administrative privileges, regardless of the permissions of the currently logged-in user.
- Keep Instance and History: This option is used to maintain the keep instance and history logs.
- Enable Logging: This Generates Workflow execution logs for this Workflow. The logs will appear on the Workflow subtab of any record that has entered the Workflow.
- Inactive: If you don’t want to run the Workflow check this checkbox.
- Release Status: You can select one of the following options:
- The Workflow only initiates for the Owner of the Workflow. This is the default Release Status setting for new Workflows.
- The Workflow initiates for any user, according to the Workflow initiation properties.
- Not Initiating. The Workflow does not initiate, but is visible on the Workflow list page. Any existing Workflow instances continue running.
- No new instances of the Workflow are created and no existing instances of the Workflow are executed. If the Workflow includes scheduled Workflow, transitions, or actions, none of them will be executed.
- Initiation:
- Event Based. This option is used when we want to execute the Workflow on a certain event.
- This option is used when you want to execute the Workflow in a certain time span.
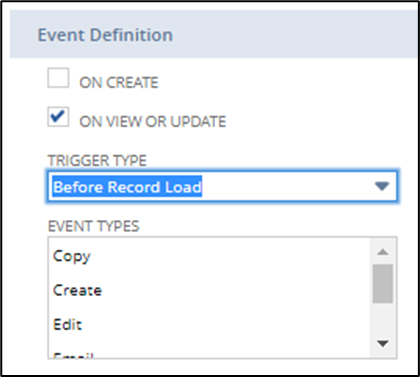
- Event Definition:
- On Create: Check this checkbox if you want to execute the Workflow when a record is created.
- On View or Update: Check this checkbox if you want to execute the Workflow when a record is viewed or updated.
- Trigger Type: If you select an Event-Based initiation for your Workflow, you must set a value in the Trigger Type field. The default value is All. The trigger type you set determines when the record will enter the Workflow.
- Event Type: The events on which a Workflow initiates or events on which actions and transitions execute. Use to specify the event type used to execute each aspect of your Workflow.
- Context: The initiation context of a Workflow, action, or transition.
For example, if you have a Workflow based on the sales order record type, and you set the Workflow initiation Context Type to Web Store, this means that only sales orders submitted through the Web Store will initiate the Workflow. Sales orders submitted through the Web Services, CSV Import, or any other context will not initiate the Workflow.
- Visual Builder: Check this radioactive button to define a condition for Workflow initiation, Workflow action, or Workflow transition using Visual Builder. Click the icon next to the Condition text box to open the Visual Builder.
- Custom Formula: Check this radioactive button to define a condition for Workflow initiation, Workflow action, or Workflow transition using a formula. Enter the formula directly in the Condition text box.
- Condition: The condition you specify using the Visual Builder or a condition with a custom formula appears in this field.
- Saved Search Condition: The Workflow initiates when a record is created.
If you select an Event-Based Workflow initiation, you must set the Trigger Type field or accept the default trigger type, all.
After filling in all the above necessary details click on Save.
Now we will create a sample Workflow to understand the concept.
Here we have created Workflow on the Lead Record in which the Memo field will get updated when we select the Sales Rep from the Sales Rep dropdown field and also mail will be sent to the current user.
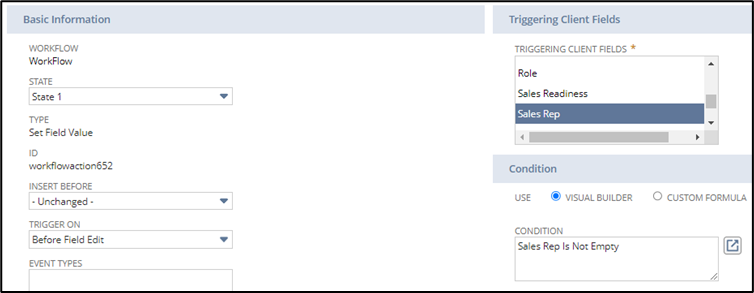
For this Workflow we require one State and two Actions that are Set Field Value and Send Email.
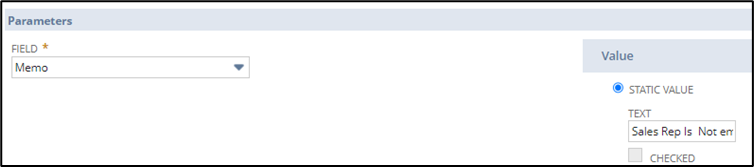
Set Field Value:
In the parameters, the Memo field is selected and Static Value is given in the text format.
In the Basic Information, Before Field Edit is selected from the Trigger On dropdown field.
Sales Rep is Selected from the Triggering Client field.
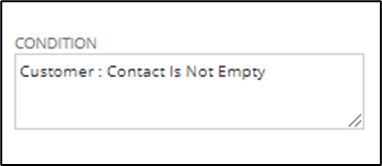
Condition is given that Sales Rep is not empty it means that when the Sales Rep field is not empty then only the Memo field gets updated.
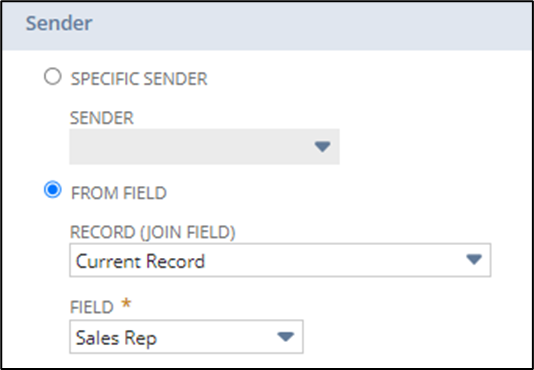
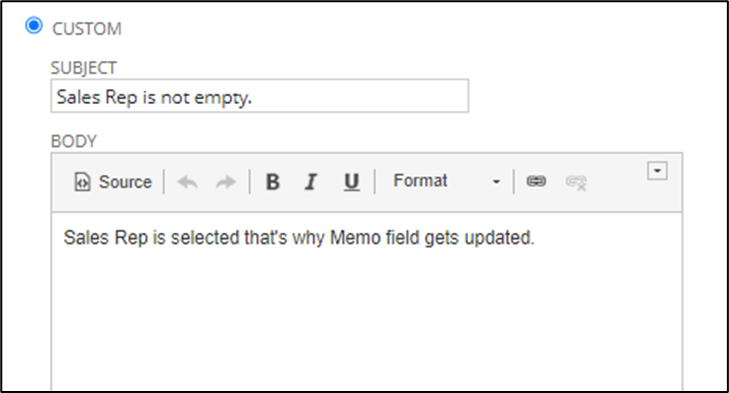
Send Email:
Sender
The selected Sales Rep will send the mail.
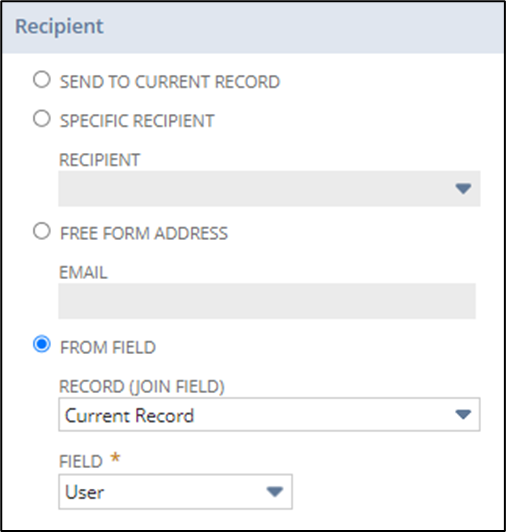
Receiver
Current User will receive the mail.
Here we can type the Subject to the mail and add content of the mail in the Body section.
Workflow Result:
Here, the Memo field gets updated when we select the Sales Rep field.

When we save the Lead record then Mail is sent to the current user by the selected Sales Rep.
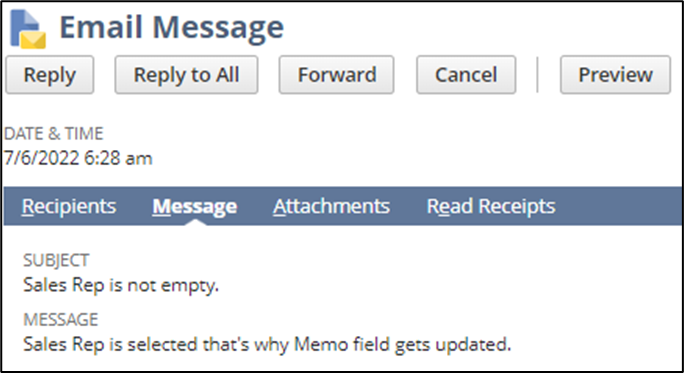
In the above screenshot, we can see that under the message subtab the mail is sent to the user by sales rep.
Thus, platforms like NetSuite make managing the business a lot easier. And our company has a lot of experience in creating Workflows to customize your business needs.
Feel free to contact us in case of any query, our experts at The Blueflame labs have immense experience regarding such implementations and will be more than happy to assist you.
Recent Blogs

Boomi AI: Revolutionizing Data Integration with AI and Machine Learning
Read More
Electronic Invoicing process in NetSuite
Read More
Salesforce D2C Commerce Setup
Read More
Understanding Microservices in .NET Core
Read More
Cloud-Based ERP vs. On-Premises: Why Rootstock ERP Is the Future
Read More
NetSuite Fixed Asset Management: A Step-by-Step Guide
Read More
Personalized Experiences in Salesforce D2C Commerce vs. B2B Commerce
Read More
Overcome Manual Testing Challenges using Automation Testing Tool Provar
Read More
 Strictly Necessary Cookies