Electronic Invoicing process in NetSuite
NetSuite’s electronic invoicing system transforms the billing process by minimizing errors, guaranteeing tax compliance, and enhancing operational efficiency. Featuring real-time tax updates and support for multiple currencies, it facilitates international transactions and improves cash flow. Explore how the robust e-invoicing capabilities of NetSuite can optimize your workflows and advance your business operations
Introduction
Managing billing and payments is made easier using NetSuite's computerized invoicing process. Businesses may improve cash flow management, increase efficiency, lower errors, and guarantee tax compliance by utilizing digital invoices. The main characteristics and advantages of NetSuite's electronic invoicing process will be discussed in this blog.
The key features of electronic invoices in NetSuite are:
- Automated Invoice Generation
- Real-Time Compliance with tax agency
- Multi-Currency and Multi-Language Support
Key benefits of using electronic invoice feature in NetSuite are:
- Increased Efficiency
- Improved Cash Flow
- Enhanced Accuracy
1. Preliminary Requirements
India Localization SuiteApp: Confirm that the India Localization SuiteApp is properly installed and activated, following the correct sequence of bundles as mentioned below:
- Priority 1: India Localization SuiteTax Engine (400562): This SuitApp offers pre-configured tax codes and tax kinds that you may apply to each newly established Nexus. Determines GST (Goods and Service Tax) associated with your purchases and sales and also determines TDS (Tax Deduction at Source) for transactions involving your vendor bills.
- Priority 2: Tax Reporting Framework (237699): This bundle gives accountants and finance users the option to create localized tax reports.
- Priority 3: India Localization SuiteTax Reports (400554): Offers tax reporting capabilities unique to India, such as localized TDS and GST tax reports for submission accuracy and convenience.
GSP Credentials: Secure the credentials from your selected GST Suvidha Provider (GSP) such as ClearTax (ClearTax is the default GSP provider for NetSuite). These credentials include:
- Username
- Password
- Connection Token (Auth Token)
- Webservice URL
- Owner ID
2. Initial Setup
Assigning E-Document Templates:
Navigation: Navigate to Setup, then select E-Documents, and finally choose E-Document Templates.
Steps:
- Select Edit next to the template you want to assign.
- Choose the subsidiary that needs the change from the Subsidiary field.
- Press Save to apply the template.
Assigning E-Document Sending Methods:
Navigation: Access the Setup menu, then navigate to E-Documents, and subsequently select E-Document Sending Methods.
Steps:
- Choose Edit next to the sending method.
- Choose the relevant subsidiary from the Subsidiary field.
- Enable the Sending Method for Certification option.
- Hit Save to apply the changes.
3. Creating E-Document Packages
Navigation: Navigate to Setup, then select E-Documents, next select E-Document Package, and finally click on New.
Steps:
- In the Name field, provide a clear and unique name for the package.
- Choose an Inbound Validation Plugin (if applicable).
- Optionally, fill in the Description field for further clarification.
- Click Save.
4. Assigning E-Document Packages
For Customers:
Navigation: Navigate to Lists --> Relationships --> Customers.
Steps:
- Select the customer from the list that you would like to modify.
- Go to the E–Document subtab.
- Select the relevant E–Document Package in the corresponding field.
- Click Save.
For Vendors:
Navigation: Navigate to Lists --> Relationships --> Vendors.
Steps:
- Choose the vendor you want from the list.
- Go to the E–Document subtab.
- Select the applicable E–Document Package.
- Click Save.
5. Adding Owner IDs for Tax Registrations
Navigation: Navigate to Setup then click on Company finally select Subsidiary.
Steps:
- Choose the subsidiary from the list.
- Go to the Tax Registrations subtab.
- Enter the Owner ID for each respective tax registration number in the relevant column.
- Click Save.
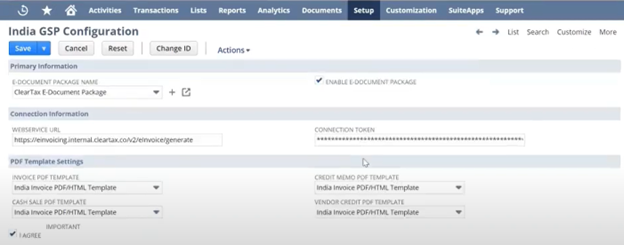
6. Configuring GSP
Navigation: Navigate to Setup the select India Localization and finally click on GSP Configuration.
Steps:
- Click Edit on the GSP configuration page.
- Select an E-Document Package.
- Enable the E-Document Package by checking the relevant box.
- In the Webservice URL area, type the GSP URL.
- Enter the Connection Token as provided by the GSP.
- Select the correct PDF templates for invoices, cash sales, credit memos, and vendor credits.
- To show that you accept the terms, check the "I Agree" box.
- Click Save.
7. Generating E-Invoices
Creating an Invoice:
Navigation: Go to Transactions --> Sales --> Create Invoices (or its equivalent).
Steps:
- Complete the necessary invoice details.
- Choose the suitable e-document template from the options available in the E-Document subtab.
- Choose a sending method in the E-Document Sending Method area if you'd like.
- If required, check the Generate PDF option for a PDF version.
- Press Save.
Generating E-Document:
- After saving, the Generate E–Document button will appear.
- Select Generate E–Document.
- Following successful creation, the invoice will be updated to reflect the following:
- A button to Certify E-Document will be present.
- "Ready for Certification" will be the new status for electronic documents.
- JSON and PDF files will be available.
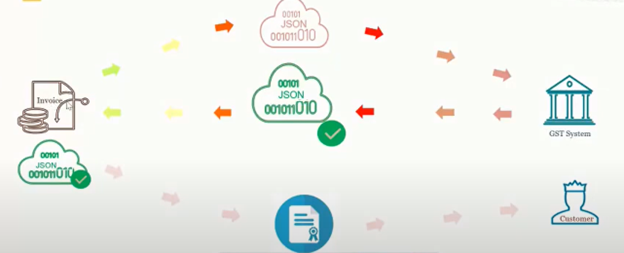
8. Certification Process
Certifying E-Document:
- Click on the Certify E-Document button.
- For invoice validation, the GST Suvidha Provider (GSP) will communicate with the Invoice Registration Portal (IRP).
- Following a successful certification, the following will be added to the transaction record:
- The E-Document is now marked as 'Ready for Sending'.
- The E-Invoice IRN (Invoice Registration Number) Details subtab contains information on certified e-documents.
- The validated PDF and JSON files are now available for download.
- Once the file has been downloaded, we can scan the QR code to verify our electronic invoice.
9. Post-Certification Updates
- After certification:
- Review the certified e-document details to ensure everything is accurate.
- Make sure that the E-Way Bill Details are present as necessary.
10. E-Way Bill Generation (if applicable)
For E-Way Bill generation, use the IRN provided by the certification process.
- Follow the required template for E-Way Bill creation.
- Ensure that the generated E-Way Bill complies with the regulatory requirements.
Steps for E-Way Bill Generation
Step 1: Access the E-Way Bill Generation Page
- Log into NetSuite org
- Navigate to Reports, select Tax, and finally click on Generate E-Way Bill.
Step 2: Choose Subsidiary (for OneWorld Accounts)
In the Subsidiary field, choose the correct subsidiary that corresponds to the transactions.
Step 3: Select GSTIN
Choose the relevant GSTIN associated with the selected subsidiary.
Step 4: Expand the Filters Section
Click on the plus icon to open up the Filters section.
Step 5: Apply Filters
- To specify the transaction period, choose the initial date in the Date From field and the concluding date in the Date to field.
- Customer or Vendor: Select a specific customer or vendor if needed.
- Transaction Type: Choose the relevant transaction types for the E-Way Bill generation.
- Status: Ensure that statuses like Not Exported, Exported, and Updated are selected (default).
Step 6: Search for Transactions
Click Search to filter the transactions based on the applied criteria.
Step 7: Choose Transactions
In the results, select the checkboxes for transactions to be included in the E-Way Bill file.
Step 8: Generate the E-Way Bill CSV File
To export the chosen transactions as a CSV file, click Generate.
Step 9: Convert CSV to JSON
- Visit the official website to download the E-Way Bill JSON Preparation Tool.
- Open the CSV file, then copy the relevant details into the tool.
Step 10: Upload JSON File Online
- The produced JSON file should be uploaded to the government's E-Way Bill website.
- Please take note of the E-Way Bill Date and the E-Way Bill Number (EBN) that the website displays upon submission.
Step 11: Update Transactions in NetSuite
- Return to the exported transactions in NetSuite.
- Edit each transaction or use the Generate E-Way Bill page to update them in bulk.
- Enter the EBN and E-Way Bill Date in the India E-Way Bill Details box.
Step 12: Verify Status Update
It is essential to verify that when the EBN and the E-Way Bill Date are entered, the status of the E-Way Bill is displayed as "Updated."
Step 13: Modify E-Way Bill Details (if required)
- Return to the Reports then to Tax and finally to Generate E-Way Bill page if required
- Apply filters and click Edit next to any transaction to adjust the E-Way Bill details.
Conclusion
Effective billing management enhances payment processes, thereby increasing operational efficiency. The automation of invoice generation minimizes manual tasks and reduces the likelihood of errors, while real-time tax compliance guarantees adherence to legal requirements. The capability to support various currencies and languages facilitates seamless international transactions. Notable advantages include expedited processing, enhanced cash flow, and improved precision in billing and tax computations. Implementation necessitates the India Localization SuiteApp and GSP credentials. The creation and certification of e-invoices ensure compliance, thereby bolstering business credibility and fostering growth.


 Strictly Necessary Cookies