Salesforce D2C Commerce Setup
Creating a direct-to-consumer (D2C) commerce platform with Salesforce Commerce Cloud demands meticulous planning and execution. This guide outlines a comprehensive, step-by-step approach to efficiently establish your D2C store.
Step by Step Salesforce D2C Commerce Setup Guide
Step 1: Establish Business Objectives
Define clear and measurable goals for your D2C commerce store. This includes identifying target markets, revenue targets, and customer experience expectations to guide the overall strategy.
1.1 Identify Your Target Audience
- Determine the characteristics of your ideal customers.
- Gain insights into their preferences and purchasing habits.
1.2 Set Clear and Achievable Goals
- Establish specific, measurable, attainable and relevant goals.
- Identify key performance metrics like conversion rates, average order value, and customer retention rates.
Step 2: Complete the prerequisites to set up a commerce store
Ensure all necessary preparations are in place, such as securing the appropriate licenses, configuring the technical infrastructure, and setting up payment gateways to support a seamless store launch.
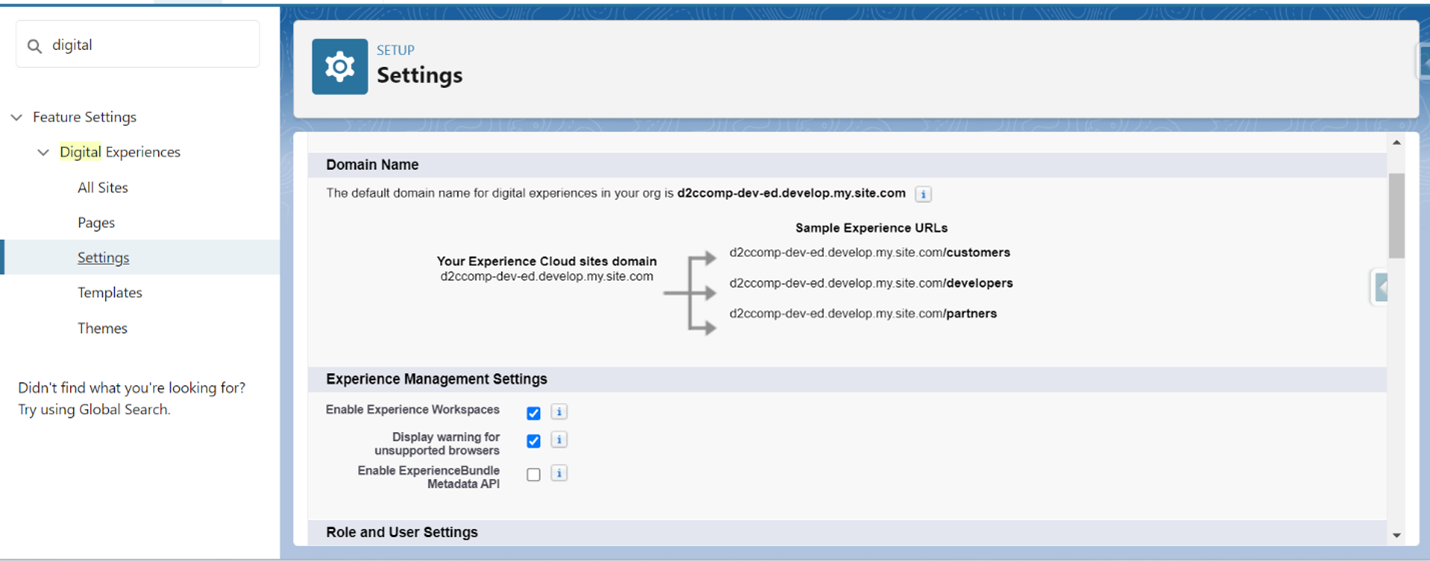
2.1 Enable Digital Experiences
- Through setup search for Digital Experiences and Select Enable Digital Experiences.
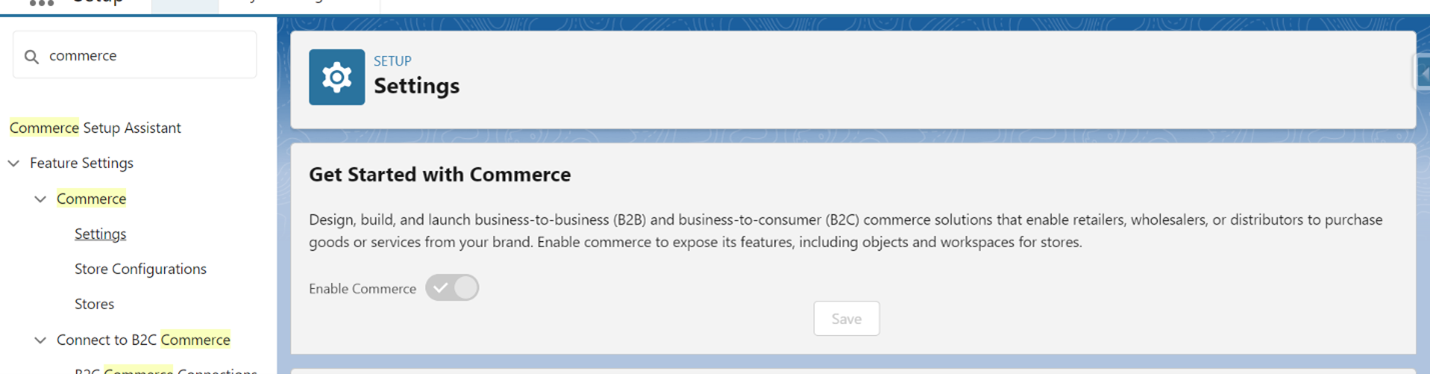
2.2 Enable Commerce
- Through setup search for Commerce and Select Enable Commerce.
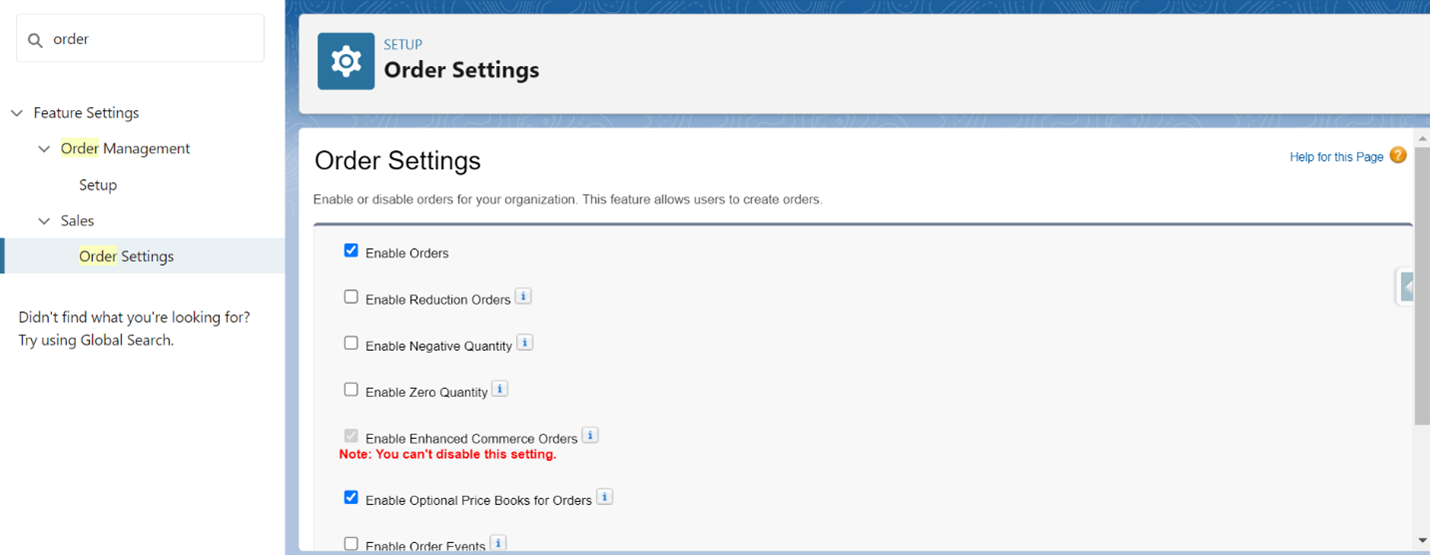
2.3 Enable Orders
- Through setup search for Commerce.
- Enable Enhanced Commerce Orders.
- Enable Optional Price Books for Orders.
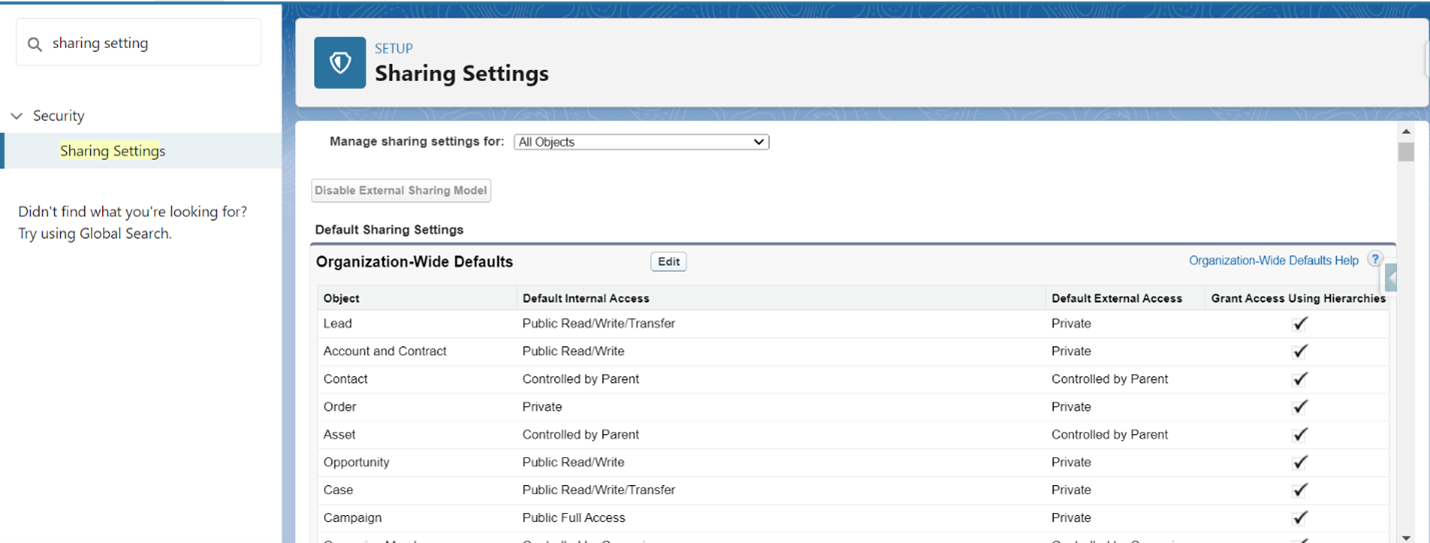
2.4 Configure Sharing Setting
- Through setup search for Sharing Settings.
- Edit and configure Organization-Wide Defaults as following
|
Object |
Default Access |
Access |
|
Buyer Group |
External |
Private |
|
Catalog |
External |
Private |
|
Electronic Media Group |
External |
Public Read Only |
|
Entitlement Policy |
External |
Private |
|
Order |
External |
Private |
|
Order Delivery Method |
External |
Public Read Only |
|
Order Summary |
External |
Controlled by Parent |
|
Product |
External |
Private |
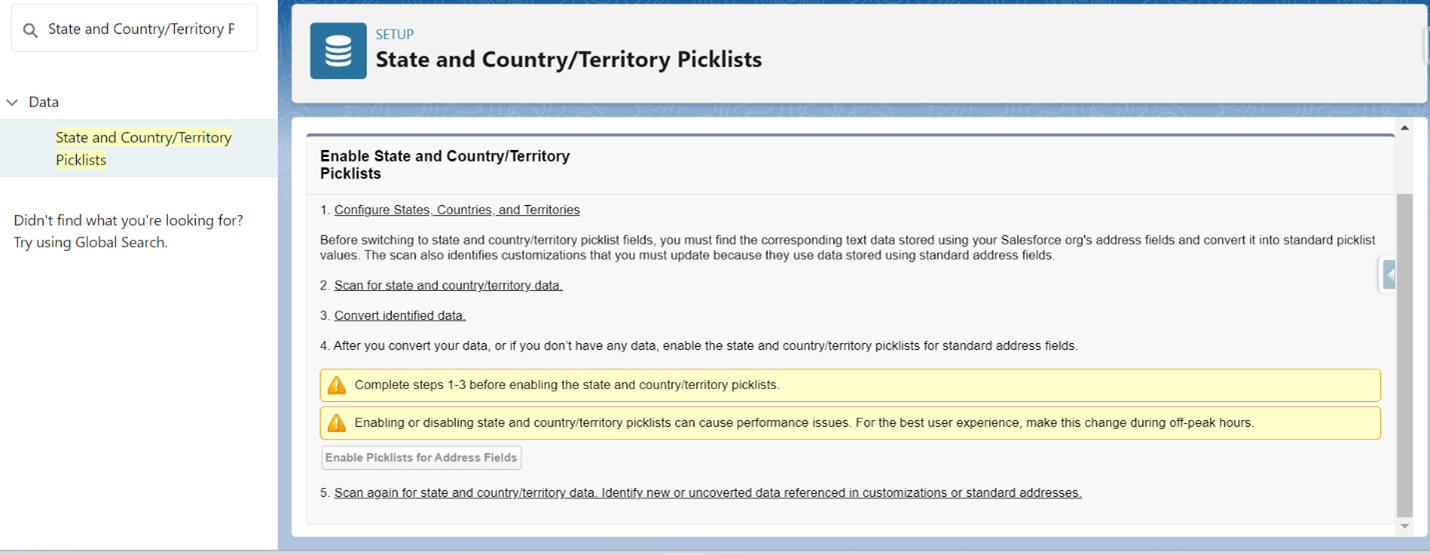
Step 3 – Enable State and Country Picklists
Activate and configure state and country picklists to ensure accurate address collection and improve the customer checkout experience. This is essential for order fulfillment and compliance with regional regulations.
3.1 Access State and Country/Territory Picklists Setup
In Setup, use the Quick Find box to search for "State and Country/Territory Picklists", then select it from the results.
3.2 Begin the Enabling Process
- Click "Get Started".
- Follow the on-screen instructions to start the enabling process.
3. 3 Review and Customize Picklists
- Review the default states and countries/territories provided.
- Customize the picklists as necessary to fit your organization’s requirements.
3.4 Enable the Picklists
Click "Enable" to activate the State and Country/Territory Picklists.
3. 5 Verify the Picklists are Enabled
- Ensure that the picklists are functioning correctly across your organization.
- Confirm that users can now select values from the lists rather than typing them manually.
Step 4 – Configure Internal Users
Set up user roles and permissions within the Salesforce platform to manage access and responsibilities. This ensures that team members have the appropriate access to perform their tasks effectively and securely.
4.1 Clone the Identity User Profile
- Through Setup search for Profiles.
- Next to Identity User Profile, select Clone.
- In the Profile Name field, enter "Commerce Business User Profile" or a custom name of your choice for internal users.
- Click Save.
4.2 Configure the Profile
- On the Profiles page, edit the newly created profile.
- In the Custom App Settings section, make the Commerce app and Digital Experiences app visible.
- In the Tab Settings section, change the following items to Default On:
- Accounts
- Buyer Group Price Books
- Buyer Groups
- Catalogs
- Categories
- CMS Channels
- CMS Experiences
- CMS Home
- CMS Workspaces
- Commerce Setup
- Customer Workspace
- Entitlement Policies
- Guest Buyer Profile
- Order Delivery Methods
- Orders
- Order Summaries
- Price Adjustment Schedules
- Price Books
- Pricing Workspace
- Promotion Workspace
- Products
- Product Workspace
- Store Price Books
- Stores
- Click Save.
Step 5 – Create a Shopper Profile
Develop comprehensive shopper profiles by collecting and organizing customer data. This enables personalized shopping experiences and targeted marketing efforts based on customer preferences and behavior.
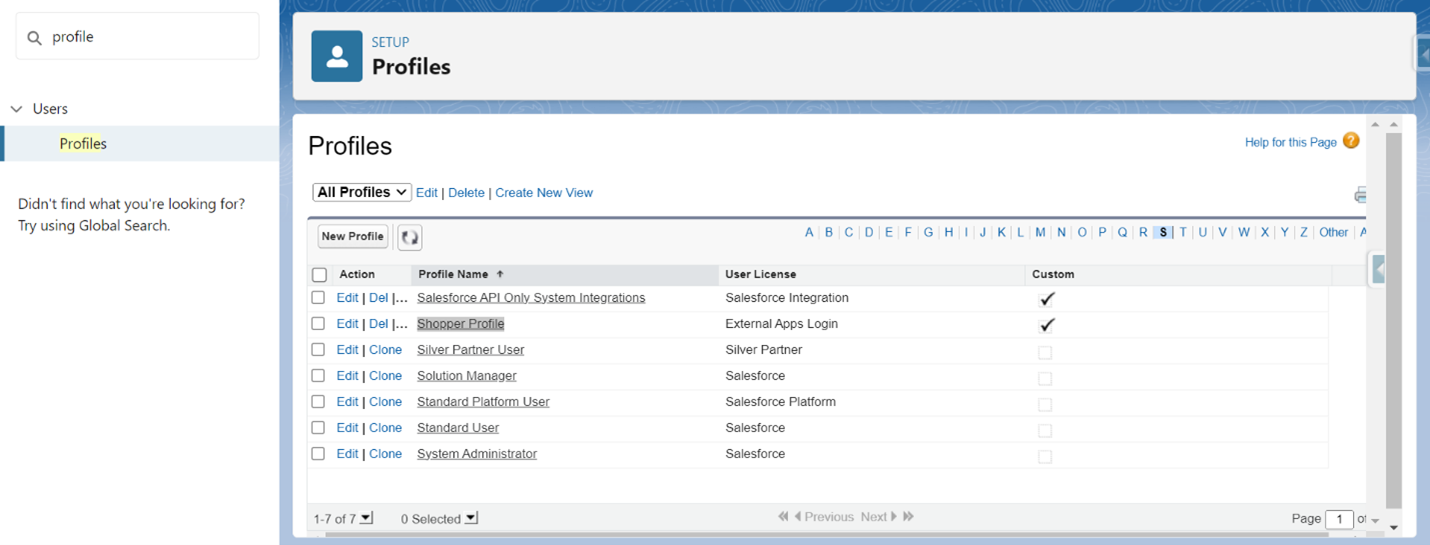
5.1 Clone the External Apps Login User Profile
- Through Setup search for Profiles.
- Click Clone next to External Apps Login User.
- For Profile Name, enter "Shopper Profile" (or another preferred name for shoppers).
- Click Save.
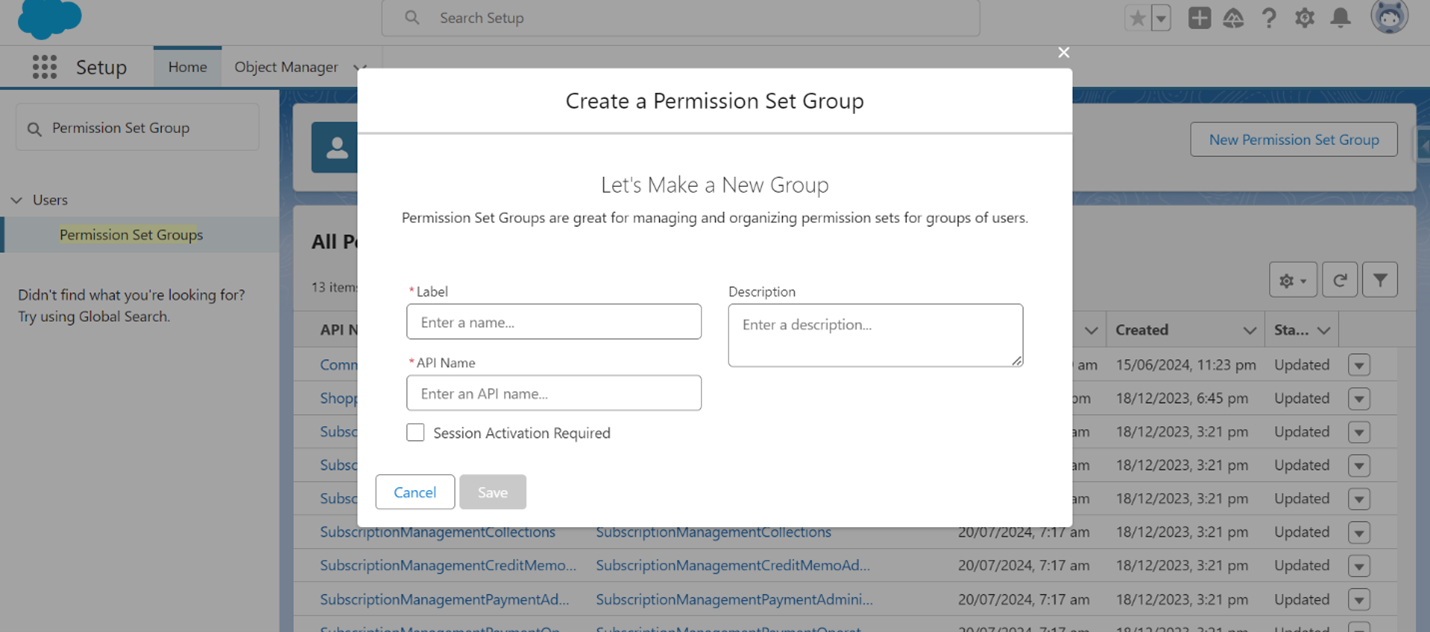
5.2 Create a Shopper Permission Set Group
9. In Setup, search for Permission Set Groups using the Quick Find box, and then select Permission Set Groups from the results.
10. Click New Permission Set Group.
11. For Label, enter "Shopper PSG" (or another preferred name for the permission set group).
12. Click Save.
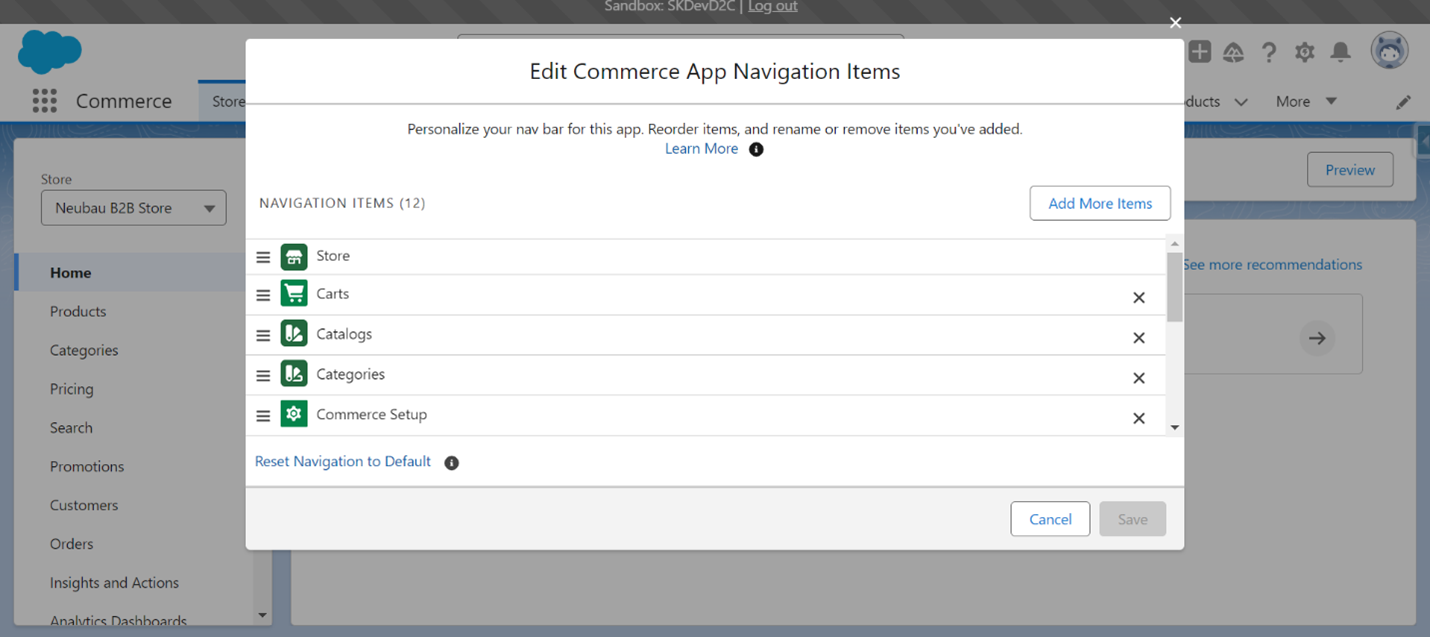
Step 6 – Customize the Commerce App
Tailor the commerce application to align with your brand identity and customer needs. This includes customizing the storefront layout, integrating desired features, and ensuring mobile responsiveness.
6.1 Access the Commerce App
13. Navigate to the App launcher and select Commerce.
6.2 Add Objects to the Commerce App Navigation
14. Click the dropdown arrow and select Edit.
15. Click on Add More Items, add the objects that your merchandisers and commerce admins manage that aren’t already included.
16. Save your changes.
6.3 Set Additional Tabs to Default On
17. Navigate to Setup > Home > Users > Profiles.
18. Select the System Administrator profile and click Edit.
19. Set tabs such as Commerce Setup and Price Book to Default On.
20. Save your changes.
Step 7 – Prevent Third-Party Attacks on Your Store
Enhance your store's defenses by implementing robust security measures to safeguard against cyber threats. This involves setting up firewalls, conducting regular security audits, and ensuring compliance with data protection standards.
7.1 Configure Session Settings
21. Through Setup search for Session Settings.
22. Enable the Require HttpOnly attribute and save the changes.
Step 8 – Install Commerce Reports
Deploy reporting tools to monitor and analyze store performance. These reports provide insights into sales trends, customer behavior, and inventory levels, aiding in data-driven decision-making.
8.1 Set Field-Level Security for Orders and Sales Stores
23. Through Object Manager, search for Order.
24. Navigate to Order > Fields & Relationships > Sales Store.
25. Click Set Field-Level Security.
26. Ensure that Visible is selected for Commerce Business User and System Administrator.
27. Click Save.
8.2 Add Sales Store Field to Order Layout
28. Click on View Field Accessibility, then select Sales Store from the dropdown menu. Make the System Administrator profile visible.
29. Ensure the Sales Store field is added to the Order Layout page layout.
30. Click Save.
8.3 Ensure Activated Picklist Value is Available for Order Status
31. Select Fields & Relationships > Status.
32. In the Order Status picklist values, ensure that Activated is listed. If not, click New and follow the UI prompts to create it.
8.4 Set Commerce Setup Tab to Default On
33. Navigate to Setup > Home > Users > Profiles.
34. Select the System Administrator profile and click Edit.
35. Change the Commerce Setup in the tab setting to be set to Default On.
36. Click Save.
8.5 Install Commerce Reports
37. Navigate to Commerce Setup: From the Commerce App navigation menu, select Commerce Setup from the dropdown menu.
38. Install Reports:
- Click on the "Add Reporting" quick link tile and select "Install Reports".
- On the subsequent page, find the list of reports and click "Install" next to each one.
- A new Commerce report folder will be created as each report is installed.
39. Install All Reports: Ensure that you install all the Commerce reports listed on the Commerce Reports page.
40. View Installed Reports: To view the reports you have installed, go back to the Commerce App navigation menu and select "Reports".
Step 9 – D2C Store Creation
Finalize the setup and launch your direct-to-consumer store. This includes testing all functionalities, ensuring a smooth user experience, and going live with your e-commerce platform to start engaging customers and driving sales.
- Create a D2C Store
41. From the Commerce App navigation menu, choose Stores from the dropdown list.
42. Select Create a Store.
43. Choose the D2C Commerce (LWR) Template and click on next.
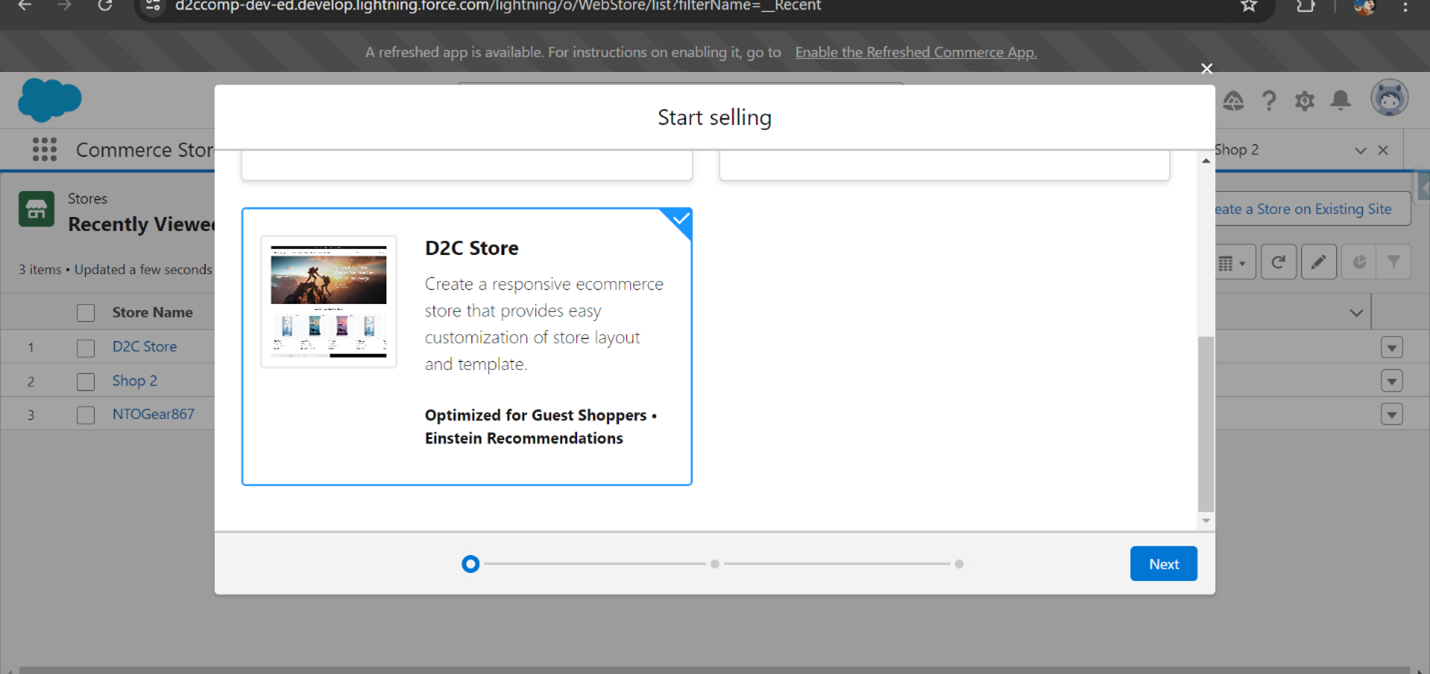
44. Select Country and Language.
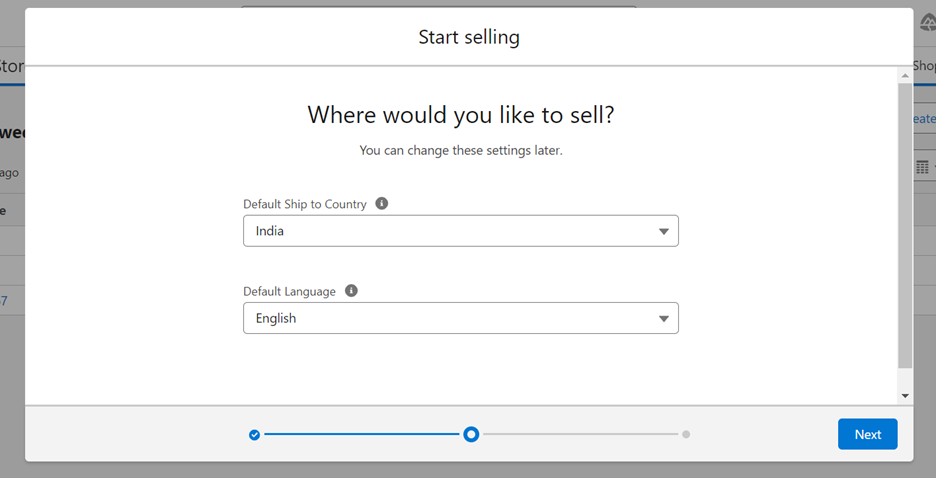
45. Enter the Store Name and a temporary URL path and click on Start Selling.
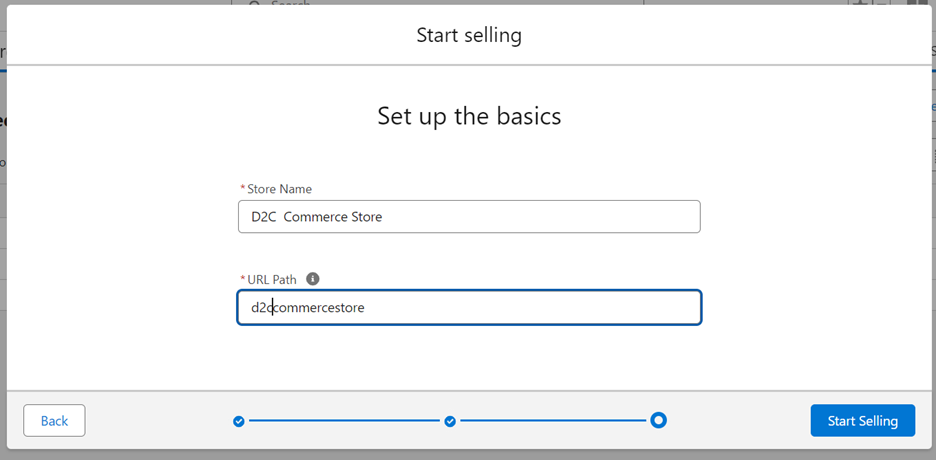
46. Your D2C Store is now set up.
Enabling Person Accounts is Not Mandatory for Salesforce D2C Store Creation
One of the great advantages of setting up a Salesforce D2C store is the flexibility it offers. Contrary to common misconceptions, enabling Person Accounts is not a mandatory step in the process. This means that businesses can streamline their setup without needing to integrate Person Accounts, making it easier and quicker to get started. The process focuses on essential configurations such as customizing profiles, setting up user permissions, and configuring the Commerce app, allowing you to efficiently launch your D2C store and start selling directly to consumers with minimal hassle.
Store
All commerce data resides within a unique entity known as a store. Stores enable the admin or manager to handle commerce data such as catalogs, categories, and products. This data enhances the buyer's experience through Experience Cloud sites. The Salesforce Experience Cloud is a premier tool for creating a front-end digital experience.
Catalog
A catalog organizes the structure of categories within a store. Products within a store are linked to various categories. A catalog is essential for viewing products in a store.
Category
Products in a store are sorted into different categories. Each category can have subcategories, up to five levels deep.
Products
Products are goods or services available for purchase in B2B Commerce stores.
Product Media
This includes images, documents, or URLs associated with a product, providing enriched information about the product.
Product Variation:
A parent product with different versions, known as child products, is called a product variation. For instance, a mobile phone is available in various colors and specifications. If a parent product has no variations, it is termed a Simple Product. Parent products are not sold directly but represent the category product.
Price Books
Each product's price is listed in Price Books.
Price Book Entries
A Price Book Entry is a product listed in a price book along with its price.
Price Adjustment Schedule
This provides discounts based on bulk orders, allowing different discount levels for various quantities ordered.
CMS Workspace
A CMS Workspace, mapped to different stores via channels, allows admins to create, share, and organize content to meet specific goals.
Orders
These are organized lists of items or services purchased by the buyer.
Buyer Group
A collection of buyer accounts with the same access and entitlements.
Entitlement Policies
These policies determine which products and related information are available to buyers based on their Buyer Group.
Checkout
Responsible for integrating all external and internal store information during the purchase process.
Cart
Holds the list of products that the buyer intends to purchase.
Order Summary
Displayed on the order confirmation page, it contains a summary of the buyer’s recent purchase.
Relationships Between Objects
Store and Catalog
A store has a one-to-one relationship with a catalog; a store can only have one catalog.
Catalog and Store
A catalog can have a one-to-many relationship with stores, meaning a catalog can be associated with multiple stores.
Catalog and Categories
A catalog can have a one-to-many relationship with categories, meaning a catalog can be associated with multiple categories.
Category and Catalog
A category has a one-to-one relationship with a catalog; a category can belong to one catalog.
Store and Buyer Groups
A store can contain multiple buyer groups, and these groups can be associated with various price books.
Buyer Groups and Buyers
A buyer group consists of many buyers, and a buyer can belong to multiple buyer groups.
Buyer Groups, Entitlement Policies, and Stores
Buyer groups can be linked to different entitlement policies and stores. Entitlement policies can be linked to multiple buyer groups and products.
Products and Price Books
Products can be linked to multiple price books, entitlement policies, and categories. Price books can contain multiple products.
Conclusion
In conclusion, establishing a direct-to-consumer (D2C) commerce platform using Salesforce Commerce Cloud is a systematic and detail-oriented process. By following the step-by-step guide outlined, businesses can effectively set their goals, configure essential prerequisites, customize user roles, and secure their platform against potential threats. The flexibility of Salesforce allows for tailored shopper experiences without the necessity of enabling Person Accounts, making the setup more straightforward. With the right preparation and execution, businesses can launch a robust D2C store that enhances customer engagement, drives sales, and provides a seamless shopping experience. This structured approach ensures that all aspects, from user permissions to product catalog management, are meticulously configured to support a successful e-commerce venture.


 Strictly Necessary Cookies