
NetSuite Project Attachment to Salesforce Case Attachment using Celigo
Introduction
In this flow, we will see how to integrate NetSuite Project files with the Salesforce Case files and detailed steps of transferring files from NetSuite to Salesforce. We will cover the key benefits of integrating these two powerful platforms, such as improved data consistency and enhanced workflow efficiency. Additionally, we will provide a step-by-step guide to ensure a seamless transfer process, including necessary configurations and common challenges.
Technologies involved
- Celigo
- NetSuite
- Salesforce
Celigo
Celigo is an integration platform as a service (iPaaS) that helps businesses automate processes and connect applications, data, and systems. It provides a user-friendly interface for creating, managing, and optimizing integration without extensive coding. Celigo offers a range of pre-built connectors and templates for popular applications such as NetSuite, Salesforce, Google Sheets, and many others, facilitating the automation of workflows and data synchronization across different systems.
NetSuite
NetSuite is a cloud-based enterprise resource planning (ERP) software suite designed to help businesses manage their core operations. It provides a comprehensive set of tools and applications to handle various aspects of business management, including accounting, financial management, customer relationship management (CRM), inventory management, order management, and e-commerce.
Salesforce
Salesforce is a cloud-based customer relationship management (CRM) platform designed to help businesses manage their customer interactions, sales processes, and marketing efforts. It provides a comprehensive suite of tools and services that allow companies to streamline their operations, improve customer satisfaction, and drive sales growth.
Used Connectors
- NetSuite
- Salesforce
Requirements and scope:
Our client wanted us to set up a Celigo flow that automatically brings in NetSuite project object files and sync them to Salesforce with respective attachments to the Salesforce Case object. This flow is designed to make it easier for them to organize the NetSuite files into the Salesforce Files.
To achieve this objective, we executed the following operations:
- Get Operation: Export the NetSuite projects to get their respective files.
- Transfer Files: Get the files by the case number (linked field for NS and SF) from NetSuite file cabinet and transfer the files to Salesforce.
- Lookup Operation: Get the additional data from the source.
- Create Operation: Attach the newly created Salesforce file to Salesforce case object according to case number.
Use Case: Integration of File Transfer
Below are the steps for Integration:
Step 1: Establish a connection with NetSuite to get the Projects and files data from export action by utilizing the NetSuite Connector.
Below are the steps needs to perform to set up the NetSuite connection and get the data:
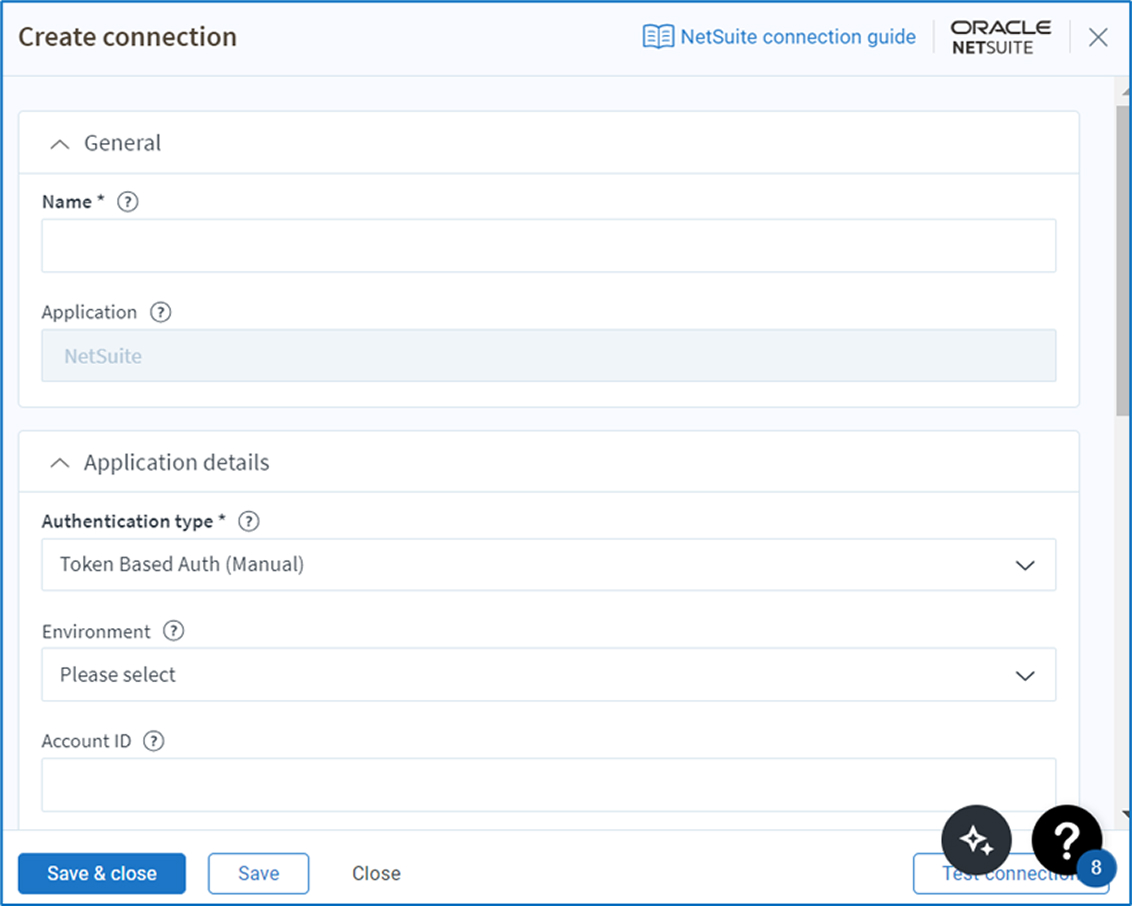
- Name: Give your link a distinctive name so that it can be found quickly.
- Authentication Type: Select Token Based Auth (Manual).
- Environment (required): Select the desired NetSuite environment to establish a connection with production or sandbox.
- Token ID: Enter the token ID value.
- Token Secret: Enter the token secret value from NS.
- iClient: Select eTail NetSuite
- To ensure the connection is operational, click the Test button to test and save the connection.
Step 2: Celigo connects to Salesforce, using Salesforce Connector.
To create the connection, you need to follow the steps below.
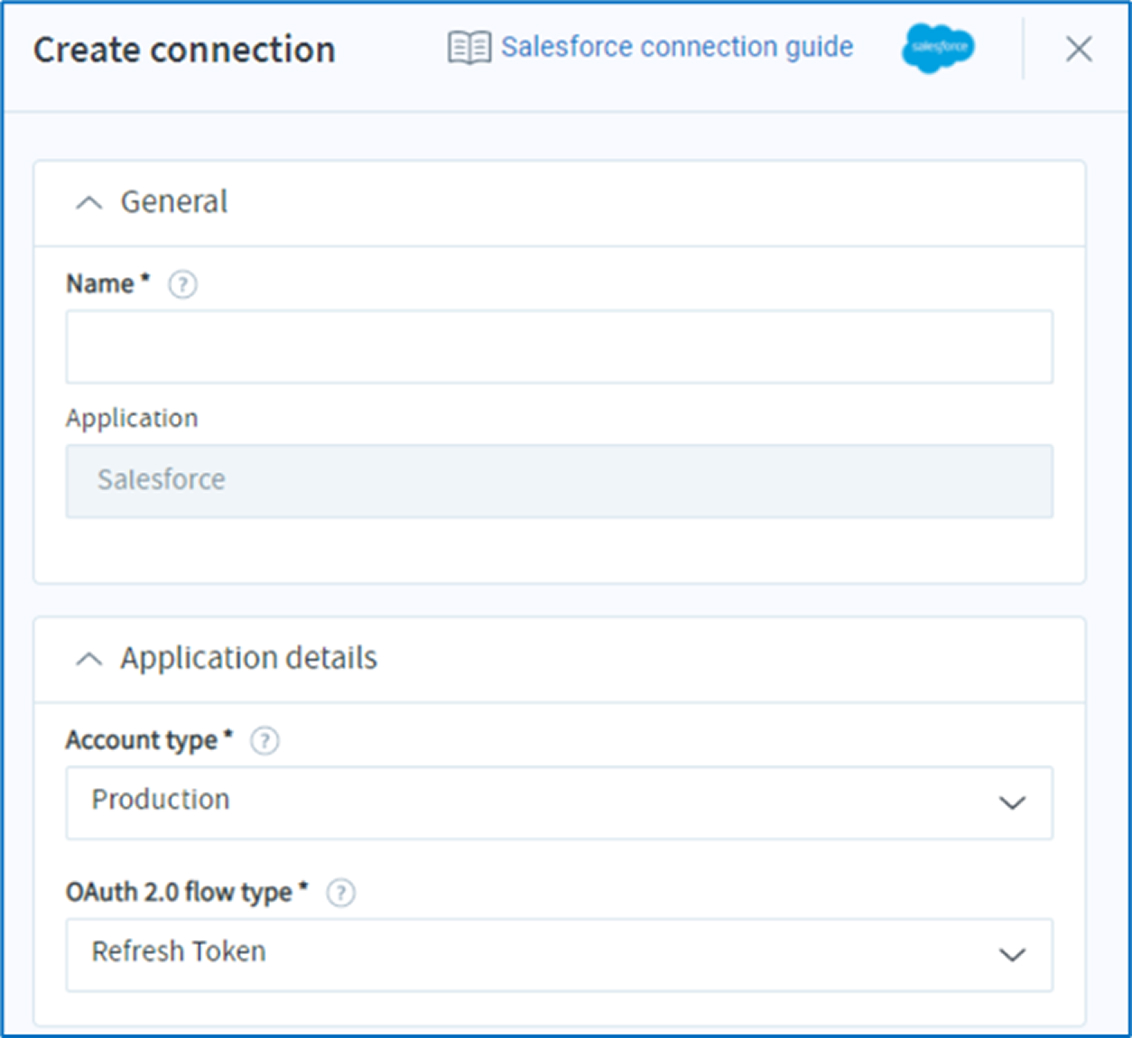
- Name: Name for your connection.
- Account type: Select the desired Salesforce environment to establish a connection with production or sandbox.
- OAuth 2.0 flow type: select refresh token.
- Username: Your Salesforce username.
- Password: Your Salesforce password.
Implementation:
After the connection setup, as per the Use Case, we implemented the Celigo flow.
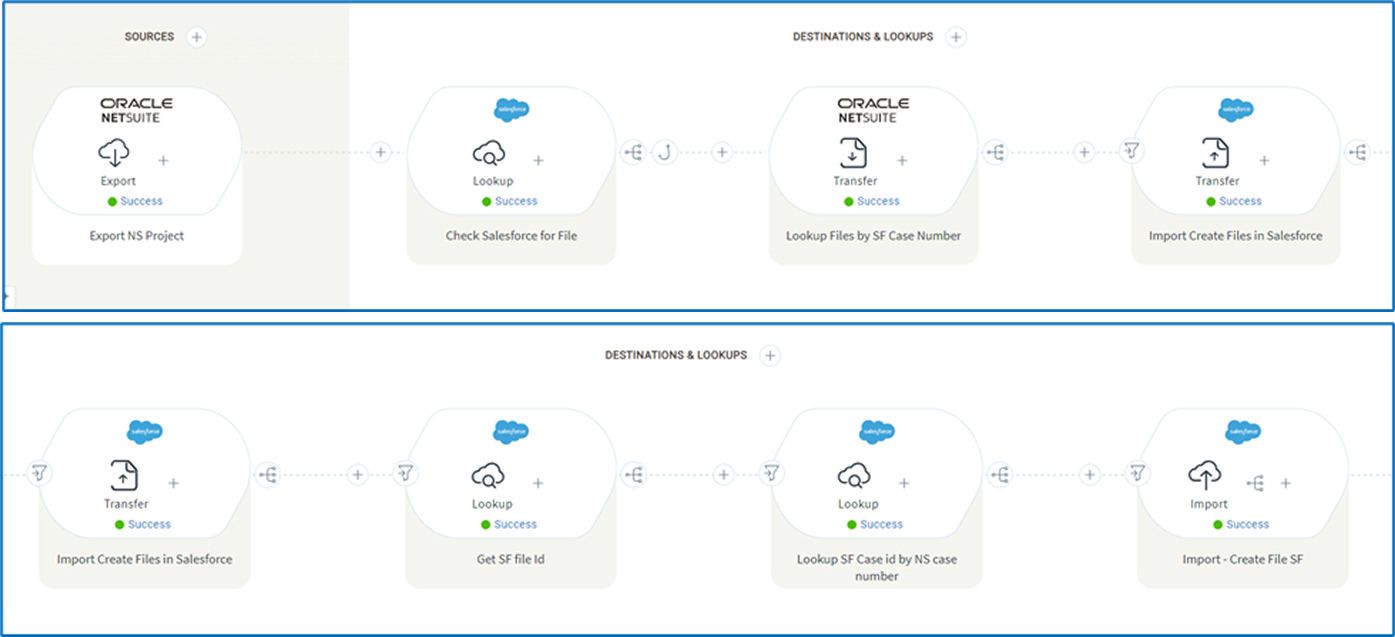
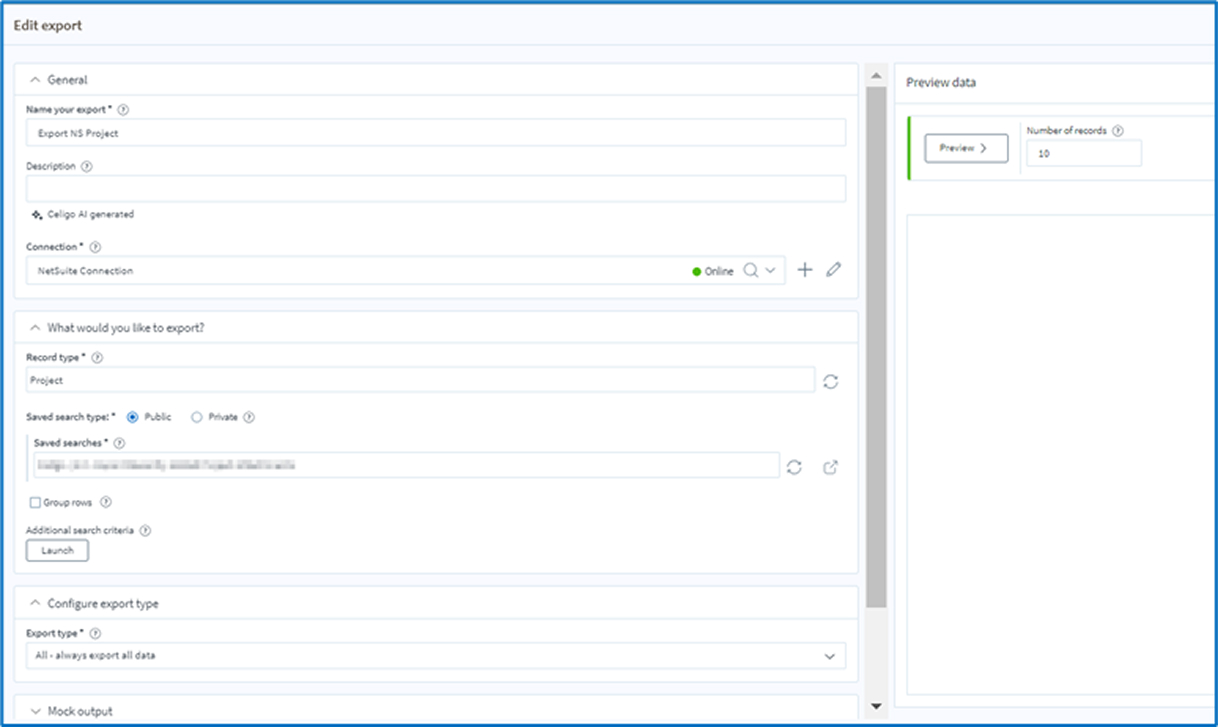
1. To export the data of the project object from NetSuite, you need to create a saved search for the project in NetSuite, applying your specific conditions and filters. This saved search will help you retrieve only the relevant project data based on the criteria you set.
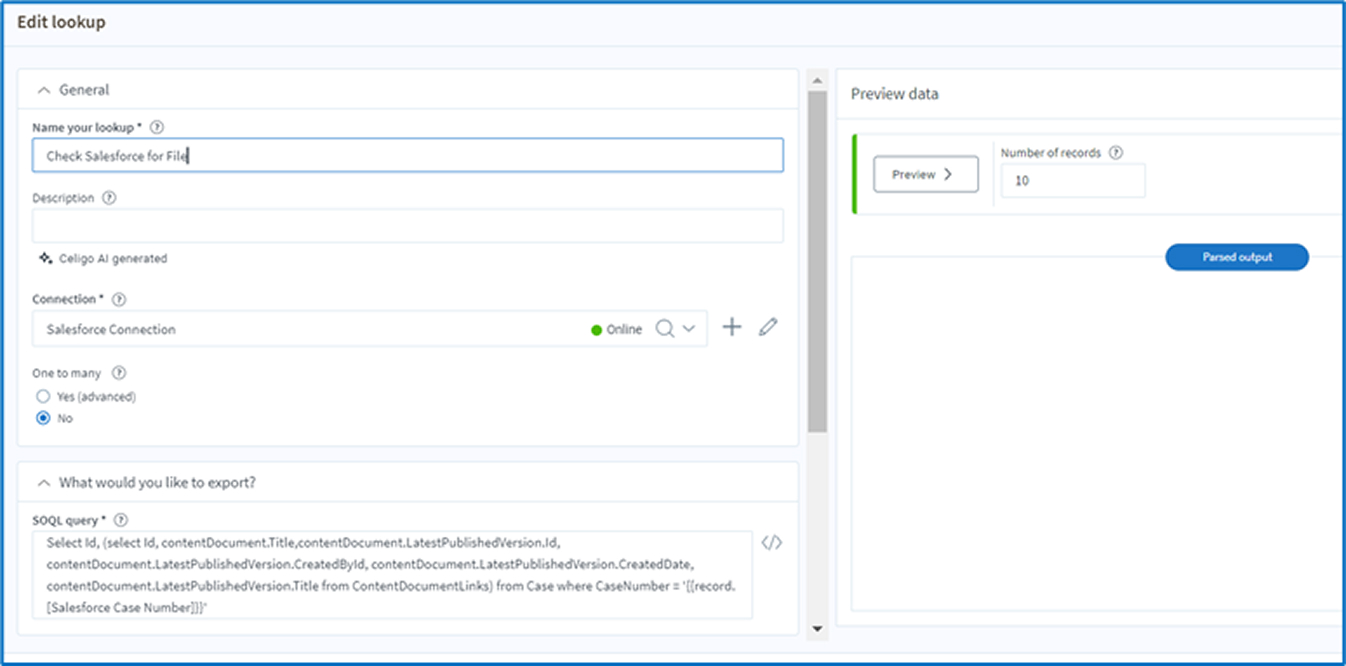
2. Since we are integrating only those records that exist in both systems, we need to verify that the record is present in Salesforce with the same case number. To accomplish this, we use a Salesforce lookup in the subsequent action titled 'Check Salesforce for File'. This action will utilize the case number to check for the existence of the corresponding record in Salesforce. By performing this lookup, we ensure that each record being integrated has a matching case in Salesforce.
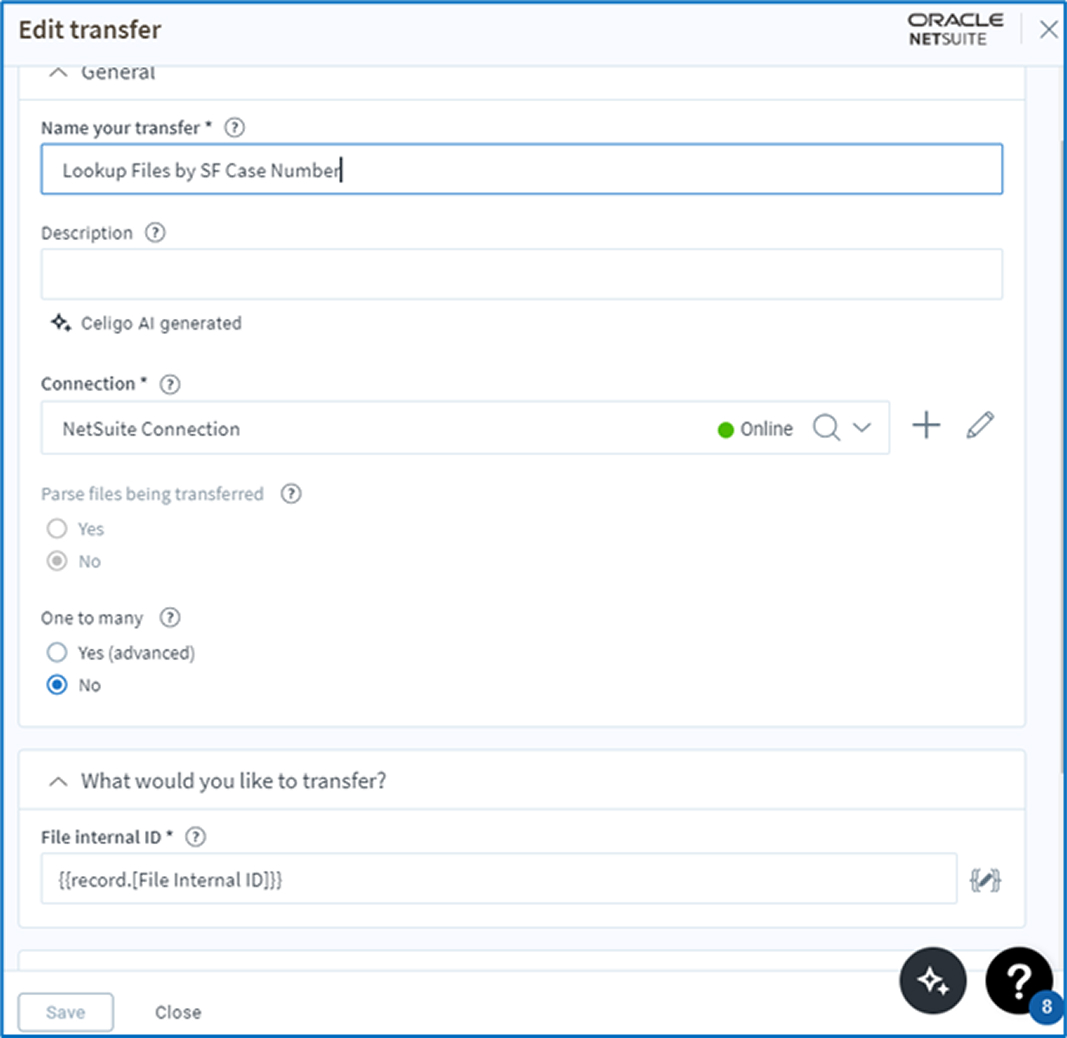
3. If the record exists, it will proceed to the next step, 'Lookup Files by SF Case Number'. In this step, the process will retrieve the respective attached project files from NetSuite using the transfer functionality.
4. Once we retrieve the files from NetSuite, we will create these files in Salesforce using the transfer action 'Import Create Files in Salesforce.

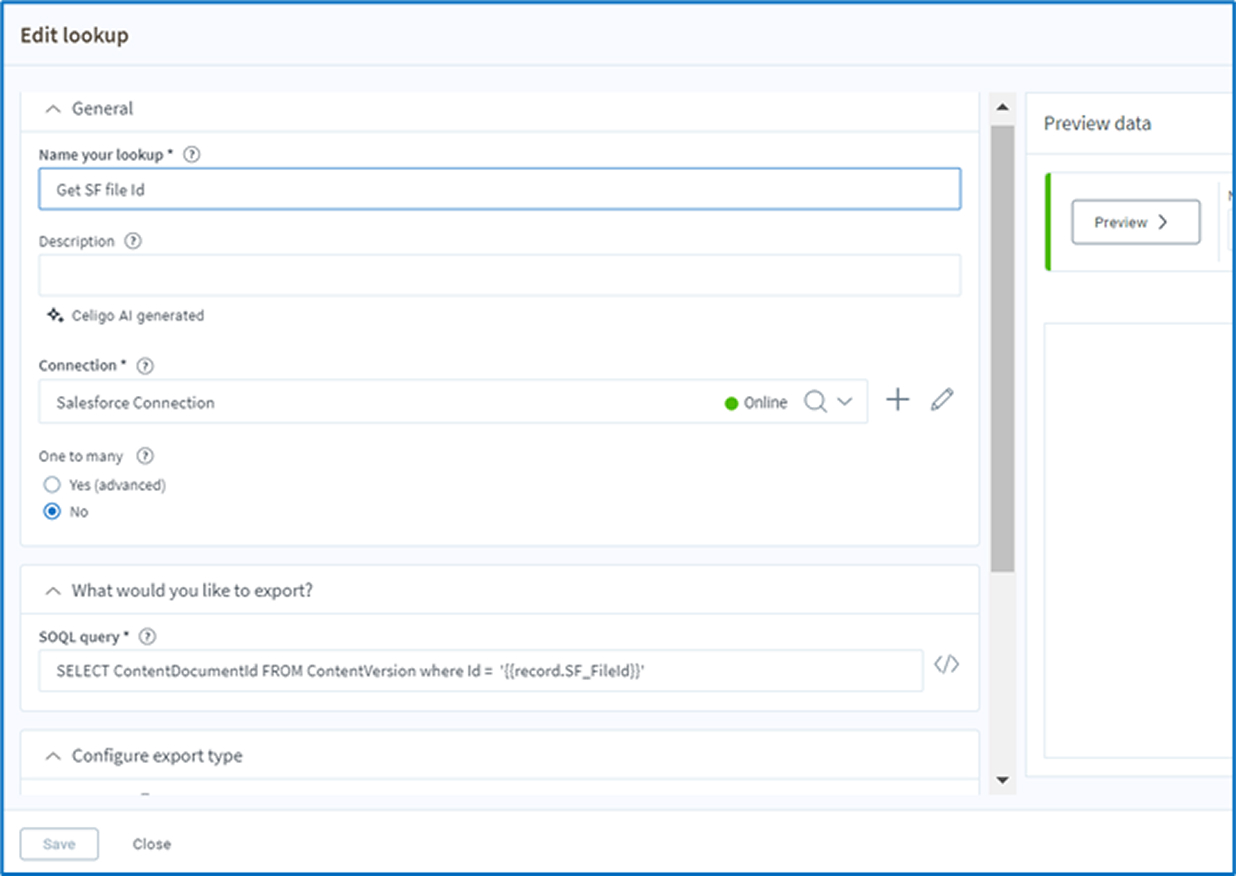
5. Now lookup the Salesforce using content version ID to get the created file ID from Salesforce same as done in step ‘Get SF file ID’.
6. To attach the created file to its respective Salesforce case record we need the Salesforce case internal ID and to get that we again perform lookup and get the SF case internal ID from Salesforce using case number.

7. To attach the file, we will configure the import titled 'Import - Create File SF'. We will pass the Salesforce case internal ID, which we obtained in the previous step, as the parent ID for the attachment. This will ensure that the file is correctly associated with the respective Salesforce case in the import mapping. By setting up the import configuration this way, we ensure that each file is accurately linked to its corresponding case record in Salesforce, facilitating a smooth and organized attachment process.

Finally, we have successfully completed the process of creating and attaching files to the corresponding records in Salesforce. The next step involves taking these records and thoroughly testing the final version of the flow. During the testing phase, it is important to identify and troubleshoot any errors that may arise. Based on the findings, make the necessary adjustments to ensure the flow operates smoothly and meets your specific requirements. This meticulous approach will help ensure the integration works effectively and efficiently.
Conclusion
Integrating NetSuite Project files with Salesforce Case files offers significant benefits, including improved data consistency and enhanced workflow efficiency. By following a step-by-step guide, which includes necessary configurations and addresses common challenges, users can ensure a seamless transfer process between these two powerful platforms. This integration not only streamlines operations but also optimizes the overall efficiency of managing project and case-related data.


 Strictly Necessary Cookies