
How NetSuite to Jira Integration Works Using Celigo (Part 2)
A. Set up a Jira connection
To establish a connection to Jira there are two ways.
- On the home page of Celigo click on the Resources menu present on navigation bar, after that click on Connections. Then, click + Create connection at the top right.
or
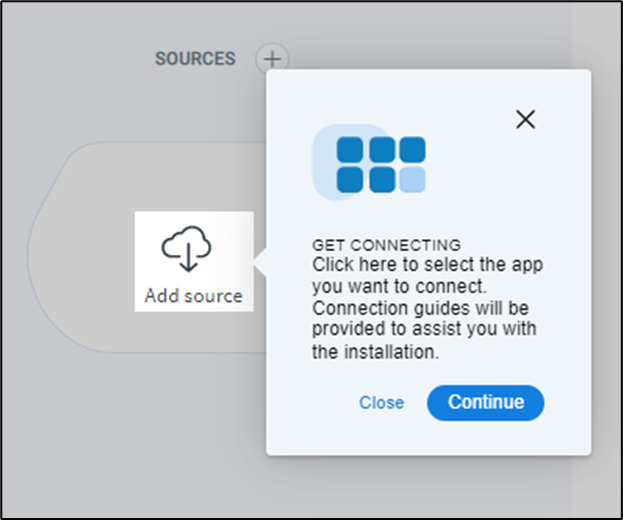
- When you are working or creating a new Integration in Celigo, there is an option to add a connection in that flow. You just need to click on Add Source or Add destination/lookup.
When you click on Create Connection a list will be opened then you need to select specific option from that list.

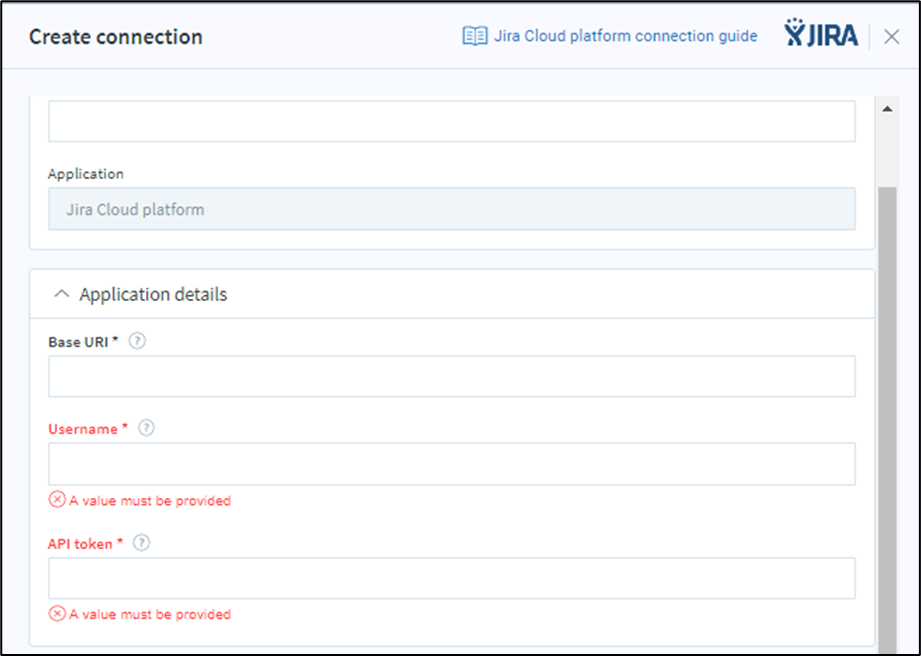
B. Describing your Jira connection
After selecting the specific application from the above list, a general setting menu will appear.
Name: The name field is a mandatory field. So, at the very first you need to provide the relevant, clear and distinguishable connection name. Because whenever you are creating a new integration, the name will act as a unique identifier and help you to better select the proper connection from the list of multiple connections that you’ve created.
Application: The Application field is mandatory and non-editable field which just displays the name of the Application that you have selected for the connection.
Base URI: This field is mandatory field in this field you need enter the Base URI for Jira Cloud platform. The base URI for Jira Cloud platform is https://jira-domain.atlassian.net. Replace jira-domain with the base URL for your Jira Cloud platform.
Username (required): This field is mandatory in this field you need to enter the username of your Jira Cloud platform account.
API token (required): This field is mandatory during this field you would like to enter the API token provided to you by Atlassian/Jira account. There are Multiple layers of protection which are used, including AES 256 encryption, for keeping the connection’s API token safe. When editing this type later, you want to enter this token again; it's stored only the connection is saved and never displayed as text.
C. Edit advanced Jira Cloud platform settings
Borrow concurrency from (optional): If you want to select another connection from the list. By default, all data flowing through a connection record is submitted to the respective endpoint application at the Concurrency level configured for that connection record.
Concurrency level (optional): Set this field to limit the number of concurrent HTTP requests (up to 25) allowed by the connection resource at any one time, or leave this field blank to use burst mode. With burst mode, integrator.io will make HTTP requests as fast as possible, with high levels of concurrency.
D. Save & test the connection
Once you have got configured the Jira Cloud platform connection, you've got some options for continuing
- Save – click this button to check the connection, commit the new connection in order that it'll be available to all or any integrations for your account
- Save & close – click to check and save the connection and exit the create connection panel
- Close – click to exit without saving any new changes
- Test connection – click this button to verify that your new connection is freed from errors
When you test or save the connection, it's verified before continuing.
The new connection is now successfully added to your account. it'll be applied to the present source or destination app if you created it within a flow. Otherwise, you will proceed to register the reference to an integration.
Once you have successfully configured the NetSuite and Jira connection in Celigo then you have to follow the below steps to create an Integration between NetSuite & Jira. So, we will be seeing how to move Project records from NetSuite to Jira.
Moving Project Records from NetSuite to Jira
Step 1: Click on + Create Flow which appears on the top right of your home page.
Step 2: So, at the very first you need to provide the relevant, clear and distinguishable flow name.
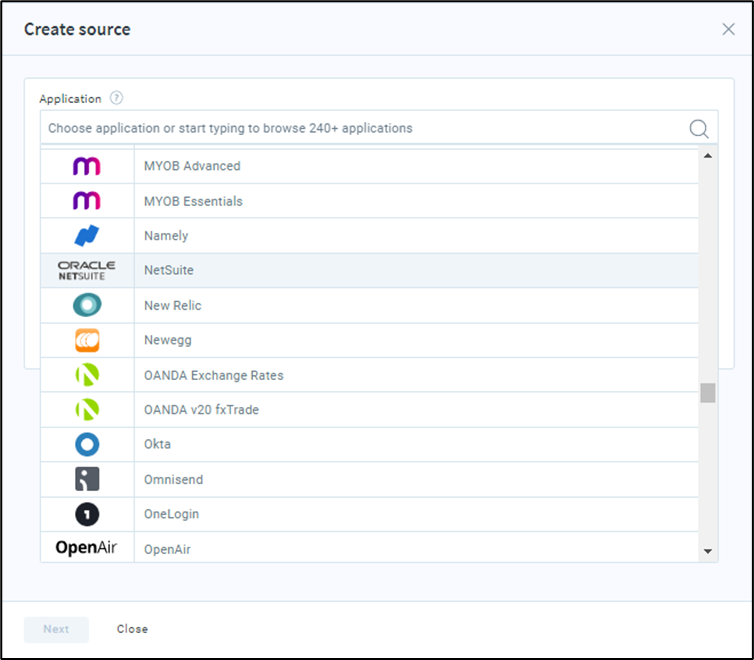
Step 3: On that page you will see two nodes Add source & Add destination. From that select Add source.
Step 4: Once you click on the Add source the below page will open and will ask you to select the source application from the list. So, Select NetSuite from that list.
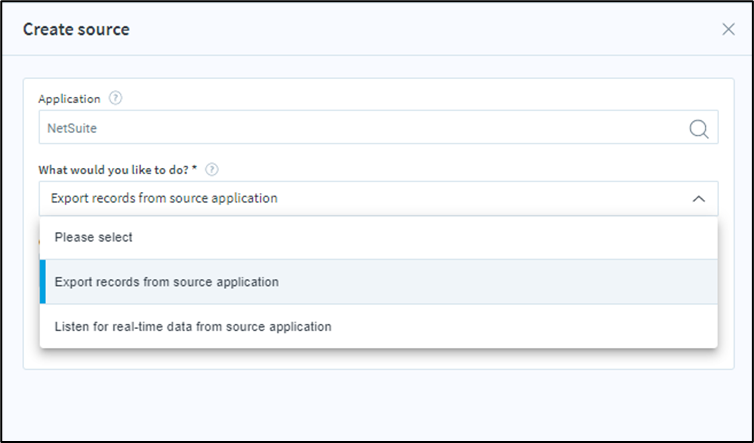
Step 5: Once you select the source application it will ask you to What would you like to do with the source application. So, there are two options available in that list
- Export records from source application
- Listen for real-time data from source application.
So, if you want to export the data by using a NetSuite Saved Search and perform actions then you can go with the first option.
And, if you want to read or listen to the real time data then you can go with the second option.
Step 6: Select the connection which you have created for NetSuite & click on Next.

Step 7: Fill all the necessary fields
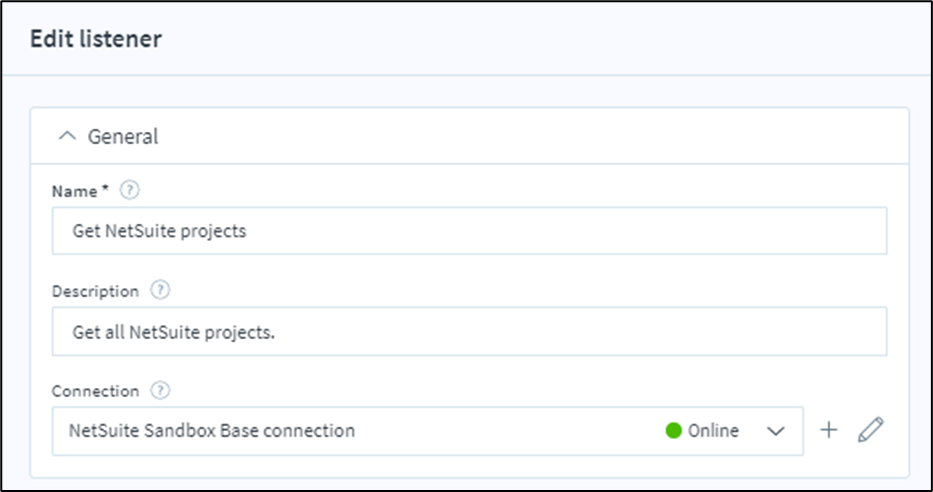
You will see three options in the General tab.
Name: This is a mandatory field. Please name your source so that you can easily reference it from other parts of the application.
Description: This isn't a mandatory field but it's always good to describe your source so that other users can quickly understand what it is doing without having to read through all the fields and settings. Be sure to highlight any nuances that a user should be aware of before using your resource in their flows. Also, as you make changes to the resource be sure to keep this field up to date.
Connection: This field will already be populated from step 6 but if you want to change the connection then you can change it again here.
You will see four options in Configure real-time export in source application tab.
Record type: Use this field to specify the NetSuite record type you would like to export. You can choose any standard record type (i.e., customer, sales order, journal entry) or any custom record type that has been defined in your NetSuite account. Please note that this list of record types is dependent on the permissions associated with the NetSuite connection being used. Also, if you add any new custom record types to your NetSuite account, or if there are any changes to the permissions associated with the connection being used, then you can use the refresh icon to regenerate the list.
Execution Context: This is a required field to specify the exact execution context values for which a record should be exported in real-time. For example, it is very common for a real-time export to run only for 'User Interface' and 'Web Store' changes. These values both represent actual end users manually submitting changes to NetSuite (like a user editing and saving a customer record in the browser, or a shopper submitting an order via the web store), and these manual data changes are normally small and also important to propagate quickly to other applications (i.e., new web orders probably need to get sent to the shipping API asap). Execution context values like 'CSV Import' are risky to enable because (1) you will slow down your mass update due to the overhead of sending data to an external system one record at a time, and (2) you may inadvertently flood your integration with way too many individual records that don't need to be synced right away (where a scheduled data flow would have been a better fit).
Sublists to include: If you want to fetch the sublist fields or data from the source application related to that record then you can add multiple sublists by using this field.
Field specific qualification criteria: If you want to add any filters for example If you want to fetch only records where status is not equal to closed then at that time you can use this field to pass various filters.

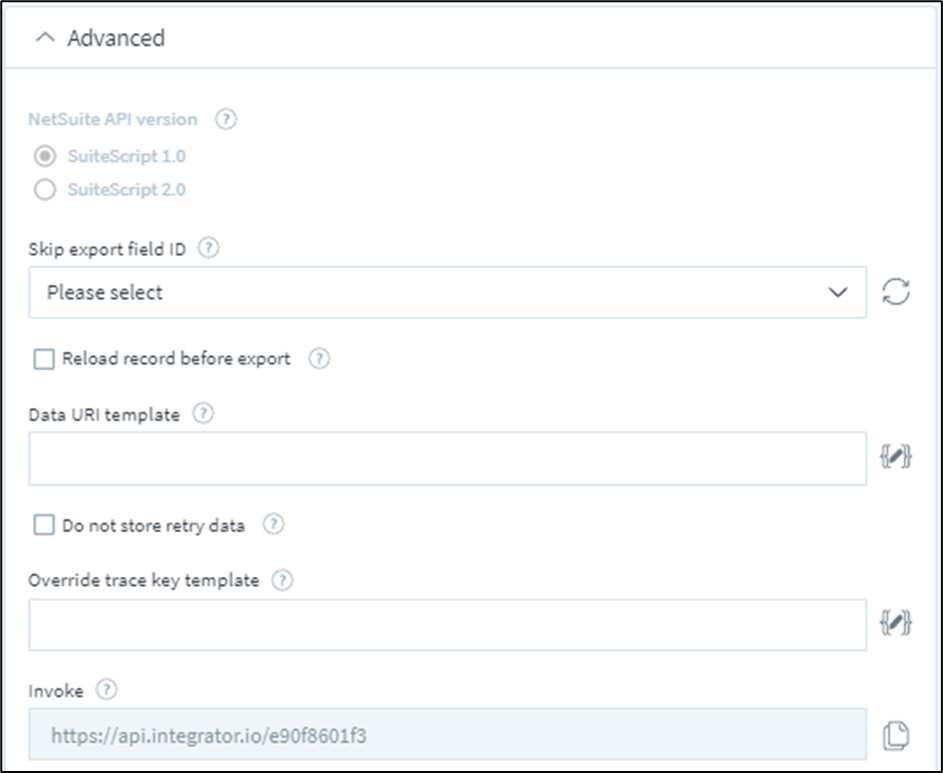
You will see five options in the advanced tab and they are not mandatory.
NetSuite API version: Select which NetSuite SuiteScript API version you’d like to configure your real-time export for. If selecting SuiteScript 1.0, you need to have Celigo’s integrator.io bundle installed in your NetSuite account. If selecting SuiteScript 2.0, you need to have installed Celigo’s integrator.io SuiteApp in your NetSuite account. In order to integrate with NetSuite, you must have one of these installed in your NetSuite account.
Skip export field ID: Allows users to specify a checkbox field on the NetSuite record type being exported which can be marked on record create/update to skip exporting the record for that operation. The checkbox will auto-uncheck itself without initiating the Realtime export.
Reload record before export: When a record is saved in NetSuite there are certain fields that are not available until after the save completes, and the only way to export those fields in real-time is to reload the record again from the NetSuite database.
Override trace key template: You need to define a trace key that integrator.io will use to identify a unique record. You can use a single field such as {{{field1}}} or use a handlebar expression. For example, this syntax {{join “_” field1 field2}} will generate a trace key template field1_field2. When this field is set, you will override the platform default trace key field.
Invoke: The resource can be invoked via an HTTP request to the unique URL which is already present in that field.
Once you have filled all the necessary fields click on save and close.
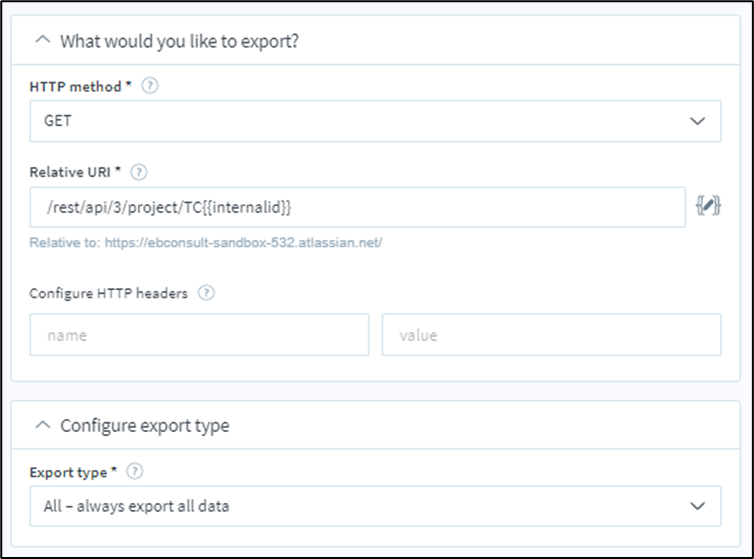
Step 8: Next on that page you will see two nodes Add source & Add destination. From that select Add destination. Then the configuration Import page will open then you need to pass all the below parameters to that fields. In this step we are posting the Project data to Jira.
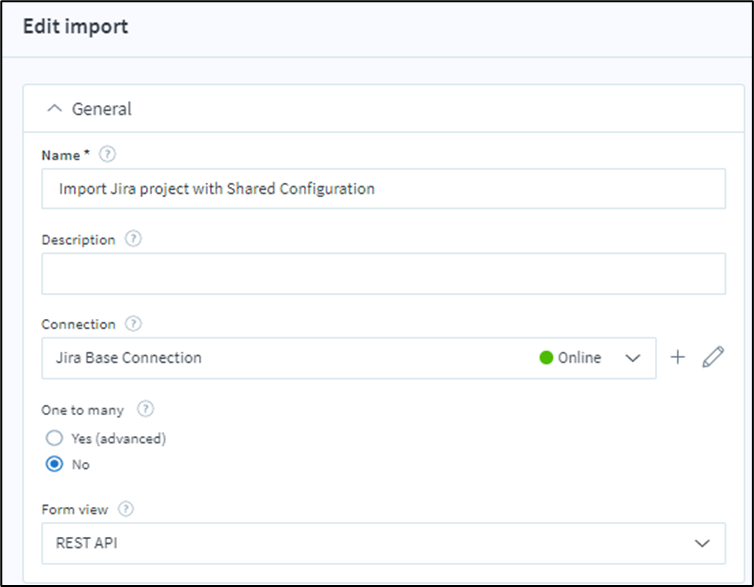
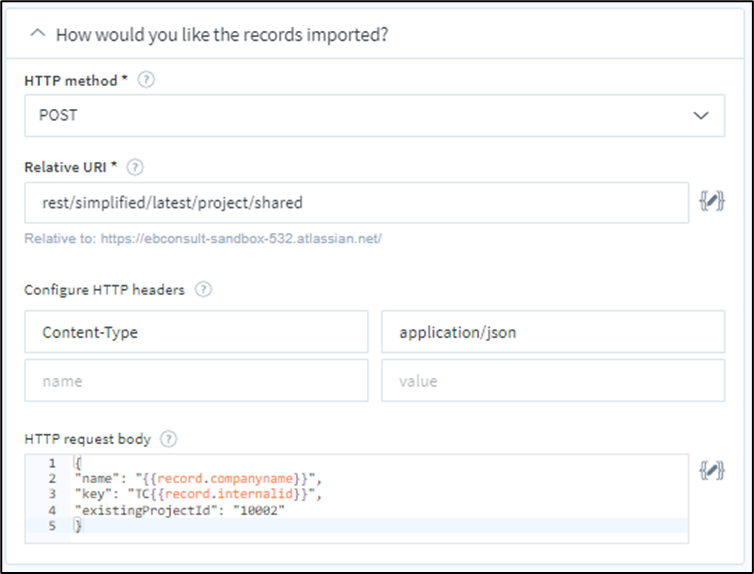

After filling in all the necessary fields click on Save and Close.
Step 9: Next In this step we need to add a lookup for getting the Jira Projects so by filling in all the below details we will be getting the Jira projects to our flow.

After filling in all the necessary fields click on Save and Close.
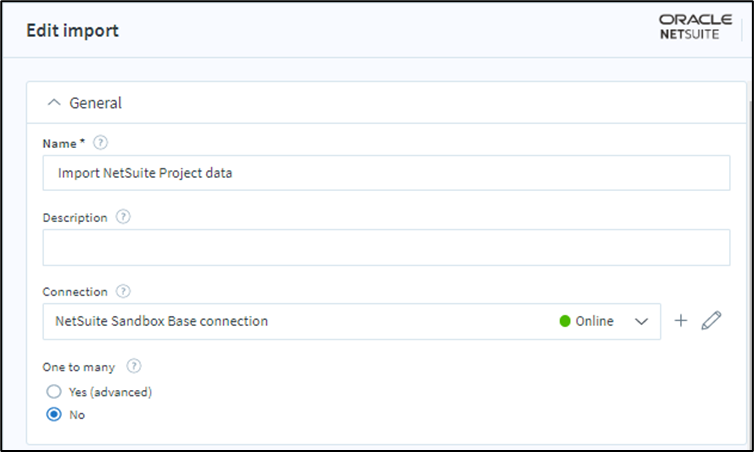
Step 10: Now we need to create one more import for updating the projects in Jira.


Step 11: Now we need to create one more import for updating the projects fields in NetSuite in order to restrict duplicate projects in Jira.

After filling in all the necessary fields click on Save and Close. And in between these nodes we also need to do some required field mappings.
Feel free to contact us in case of any query, our experts at The Blue Flame labs having immense experience regarding such implementations will be more than happy to assist you.


 Strictly Necessary Cookies