
Advanced Billing in NetSuite: Introduction to Billing Schedules
Concerned about managing recurring billing or billing schedules? NetSuite’s Advanced Billing feature helps you create billing schedules for invoice sales over a commitment term or a timeframe and manage the billing process for the customers as well as recurring billing.
Let’s take a deep dive into the Advanced Billing feature and learn about the billing schedules in NetSuite in this blog.
Introduction:
Advanced Billing is particularly useful for managing recurring charges, such as monthly fees for a one-year membership. Billing schedules help track when to invoice customers and the amounts due. Additionally, Advanced Billing provides robust reporting and analytics capabilities, allowing companies to gain insights into their billing operations and make informed decisions.
- When a billing schedule is linked to a sale, NetSuite adds the invoice to the billing queue based on the schedule's intervals.
- Invoices can then be generated from this billing queue.
- An initial bill is generated on the start date specified in the order or upon fulfillment of the order if no start date is provided.
- For example, a billing schedule may outline an initial invoice for 30% of the total sale amount and the remaining balance is divided evenly across following monthly invoices.
- Users can view and manage billing schedules directly from the sales order page and can manually create any upcoming invoices if necessary before they are automatically generated by NetSuite.
This functionality of billing schedules ensures accuracy and efficiency by integrating seamlessly with other NetSuite modules like CRM, financials, and project management.
Let's now see how we can start using this feature in NetSuite.
Enabling Advanced Billing feature:
To start using advanced billing you need to enable this feature in ‘Enable Features’ in your account.
Prerequisite:
- Sales Order (enabled)
Steps to enable Advanced billing: -
- Login to NetSuite.
- Go to Enable Features
- (Navigation to Enable Features: Setup > Company> Enable Features).
- Click on the Transactions subtab.
- Scroll down or search for ‘Advanced Billing’ (It is present under Billing).

- Click on ‘Save’
What are Billing Schedules?
A billing schedule in NetSuite defines the timeline for invoicing a sale throughout a specified period or contract term. By keeping track of when and how much to bill consumers, it facilitates the management of the billing process. Billing schedules can be customized for different types of sales, such as having a fixed initial payment or charging a percentage of the total amount.
Optimizing Sales with Billing Schedules
Effective billing schedules are essential for optimizing sales processes and ensuring consistent revenue flow in NetSuite.
- Establishing Billing Schedules:
- Estimates or sales orders can be used to establish billing schedules, which can be designated as either public or private.
- Private schedules are only visible on the transactions from which they were created.
- Billing Process:
- Before moving on to the next invoice in NetSuite, all fulfillable products must be properly billed on the prior one.
- The timetable will not go forward if an item is not fully billed.
- Billing schedules can be viewed and managed from the sales order or estimate page.
- Role in Sales Forecasts:
- The schedules play a crucial role in sales forecasts by evenly distributing revenue throughout the billing period.
- You can adjust the recurrence as necessary and set it for weekly, monthly, or quarterly.
- Application of Billing Schedules:
- Billing schedules can be applied to either an entire sales order or to individual line items.
- Additionally, you can assign default schedules to item records for automatic applications.
- Discounts and Markups:
- Discounted items and markups can be added to orders with a billing schedule but can’t be allotted to billing schedules.
Billing Schedule Creation
You can create billing schedules for both products and services. These schedules define the timeline for invoicing customers over a specific period or contract term. They assist in managing the billing process by detailing when to send invoices and how much to charge. For instance, you can put up annual billing for a three-year service contract.
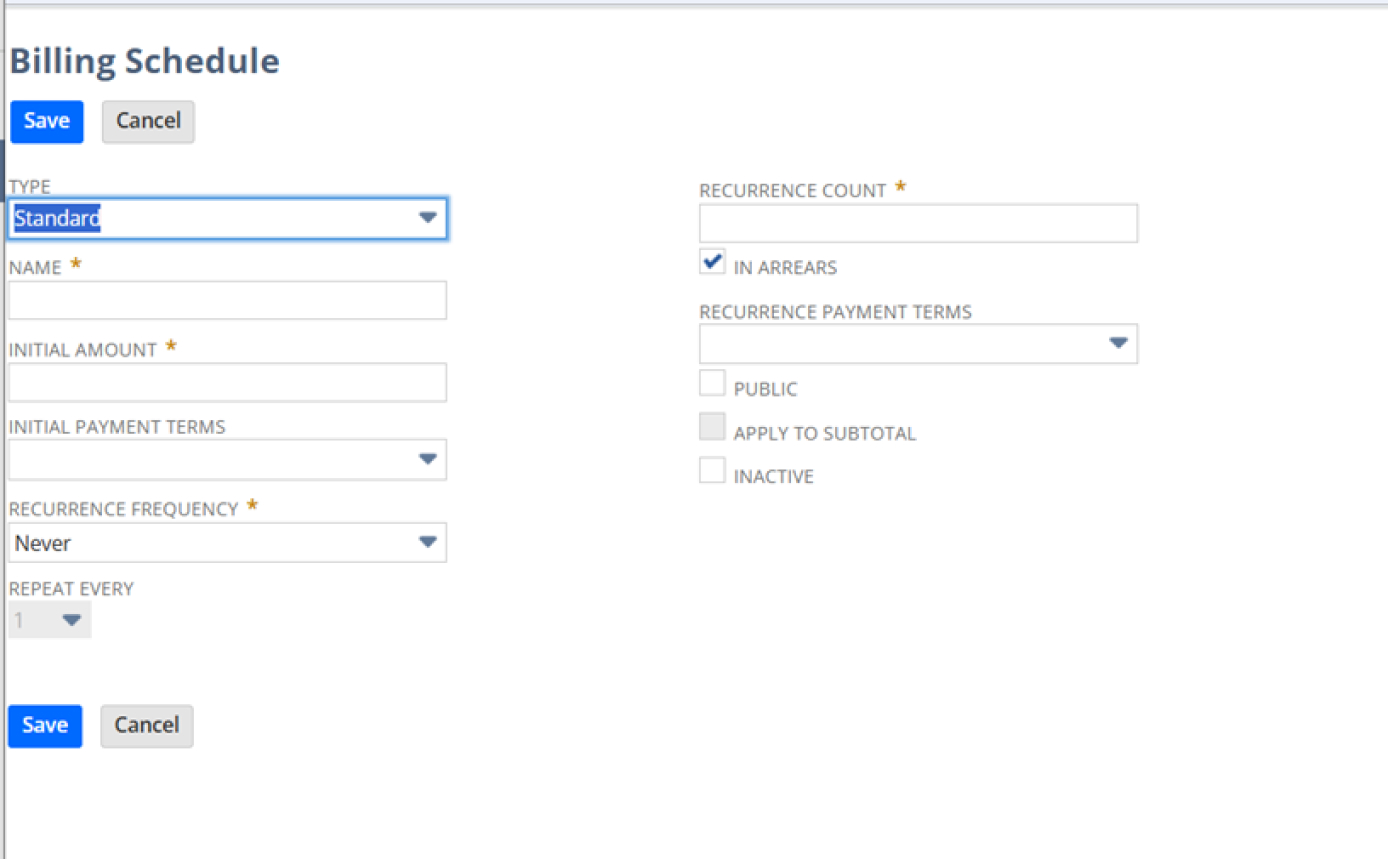
Fields in the Billing Schedule form: -
- Type: Select the kind of billing schedule. The options for this field are:
- Charge-Based
- Fixed Bid Interval
- Standard
- Time and Materials
Note that: these need to be enabled in your account beforehand. Otherwise, this field will not be visible on the billing schedule form.
- Initial Amount: The starting amount for the billing schedule. (the amount can be in percentage or in numbers)
- Recurrence Frequency: Select the frequency for bills to recur.
The recurrence frequency options are:- Daily
- Weekly
- Monthly
- Quarterly
- Annually
- One Time
- End of Period
- Start of Period
- Custom
- Initial payment terms: The terms for the initial payment amount.
- Repeat Every: Frequency of recurring invoice generation
- Recurrence Count: Number of following payments you want the order amount divided into.
- Recurrence Payment terms: Terms to be used on all invoices after the initial invoice.
- In Arrears: To bill at the end of each period check this checkbox
Steps for the creation of a billing schedule: -
- Navigate to billing schedules: Lists > Accounting > Billing Schedules > New
- Enter a Name and type of schedule.
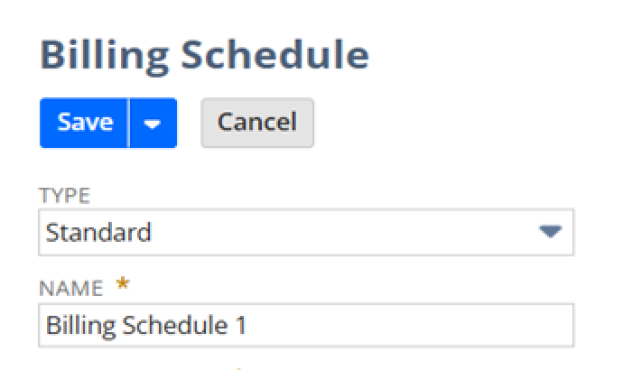
- Fill in the ‘Initial Amount’.

- Fill in the ‘Initial Payment Terms’.

- Give the recurrence frequency if you want it to be repeated and how you want it to be repeated and the recurrence payment terms which tell us how the terms for further invoices will be after the first one. Enter a recurrence count which defines the number of invoices or cash sales generated after the initial sale.
- Click on

Billing Schedules creation and application from Sales orders
Steps to create one from SO or an estimate and apply them: -
- Navigate to: Transaction > Sales > Enter Sales Order
- Go to the Billing
- In the Billing Schedule click on the ‘+’ symbol beside the field
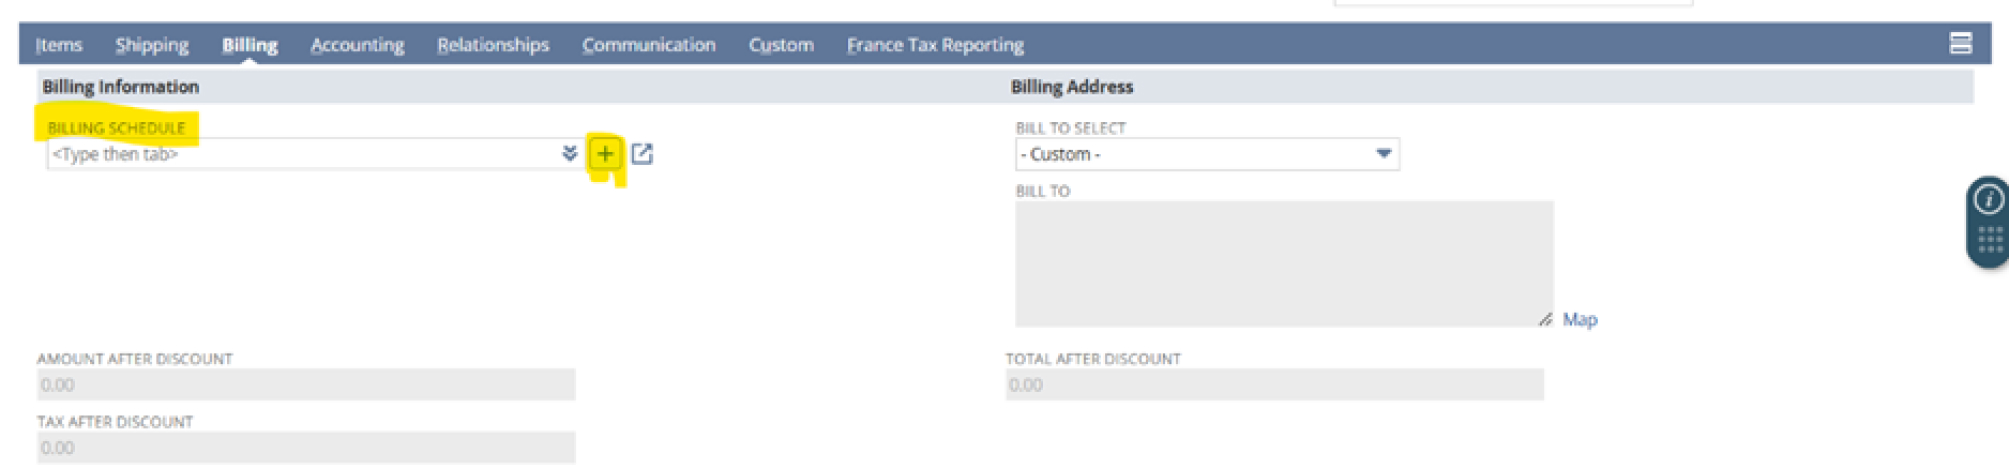
- It redirects you to the billing Schedule form
- Follow the steps for the creation of the billing schedule as we have seen earlier.
- Click on Save.
- Select the billing schedule which you have just created earlier.
Billing schedules can also be created from estimates.
Use case Scenario:
Background: Imagine a company, "B Solutions," that offers a subscription-based software service. Customers choose quarterly, annual, or monthly subscriptions. To manage recurring payments efficiently, B Solutions uses NetSuite's Advanced Billing feature.
- Setting Up Billing Schedules:
- Monthly Subscriptions: B Solutions creates a billing schedule that invoices customers on the first day of each month. This schedule repeats every month, ensuring that customers are billed consistently.
- Quarterly Subscriptions: Customers who opt for quarterly billing, a new billing schedule is created for them. This schedule invoices customers every three months, aligning with the start date of their subscription.
- Annual Subscriptions: An annual billing schedule is set up to invoice customers once a year on the anniversary of their subscription's start date.
- Creating Sales Orders:
- When a customer subscribes to a service, a sales order is created in NetSuite. The appropriate billing schedule (monthly, quarterly, or annual) is attached to the sales order based on the customer's chosen plan.
- Automating Invoices:
- NetSuite automatically produces invoices in accordance with the billing schedule. For example, if a customer is on a monthly plan, an invoice is created and sent out on the first of each month without manual intervention.
- Managing Recurring Billing:
- The recurring billing feature ensures that invoices are generated and sent out at specified intervals. This helps B Solutions maintain a steady cash flow and reduces the risk of missed payments.
- Customizing Billing Schedules:
- B Solutions can customize billing schedules to include specific terms, such as discounts for early payment or penalties for late payment. This allows the company to alter billing processes to meet customer preferences and business needs.
Conclusion:
In conclusion, NetSuite's Advanced Billing feature offers a comprehensive solution for managing recurring billing and billing schedules. Whether you're dealing with monthly memberships or long-term service contracts, Advanced Billing provides the tools to streamline your billing operations and gain valuable insights through robust reporting and analytics. Start leveraging this powerful feature today to optimize your billing processes and drive consistent revenue flow.
For any inquiries regarding NetSuite implementations, please do not hesitate to contact our experts at Blueflame Labs. We will be glad to assist you.


 Strictly Necessary Cookies