
A Guide to NetSuite Bank Reconciliation
Introduction to Bank Reconciliation
In the fast-paced world of business, maintaining accurate and up-to-date financial records is crucial for decision-making and ensuring compliance. One of the key aspects of this is bank reconciliation, a process that matches the company's financial records with bank statements to identify any discrepancies.
NetSuite ERP system offers a comprehensive bank reconciliation module that simplifies this task, providing businesses with real-time financial accuracy and efficiency. This blog will delve into the NetSuite bank reconciliation process, highlighting its importance, steps, and best practices to optimize its use.
Getting Started with NetSuite Bank Reconciliation
NetSuite's bank reconciliation process utilizes the Bank Feeds SuiteApp to conduct the bank reconciliation process. The Bank Feeds SuiteApp streamlines the process of transferring bank data from your financial institution accounts to NetSuite. It utilizes the Financial Institution Connectivity Plug-In and a verified account information service provider to securely access online financial information. This SuiteApp retrieves bank data on a daily basis and imports it into your account, making the bank reconciliation process more efficient.
Prior to utilizing the Bank Feeds SuiteApp to its maximum capacity, make sure that the following prerequisites are fulfilled.
- Bank Feeds SuiteApp Installation: The Bank Feeds SuiteApp must be installed. This can be done via the SuiteApp Marketplace.
- Enable feature: Enable the checkbox for Match Bank Data and Reconciliation on the GL account
- Bank Account Details: Prepare your bank account information, including your online banking login details.
- Roles and Permissions for Bank Feeds: Users having Administrator access or custom roles with Financial Institution Records permission can only set up the bank feeds integration.

Setting Up and Using the Bank Feeds SuiteApp
The Bank Feeds SuiteApp allows for automatic import of bank statements, simplifying the reconciliation process. To configure and utilize it, follow the below mentioned steps:
Step 1: Install the SuiteApp
- Navigate to SuiteApp Marketplace.
- Search for "Bank Feeds SuiteApp" and proceed with the installation steps provided.
Step 2: Configure Bank Feeds
The SuiteApp connects to the financial institution through any of the following:
- Simple login - Connect to your financial institution by using your login credentials to gain access to your banking institution.
- Multifactor authentication (MFA) – In addition to your username and password, connect by providing authentication information to validate identity. Example: one-time passwords and two-factor authentication (2FA).
Step 3: Setting Up Bank Feeds Integration
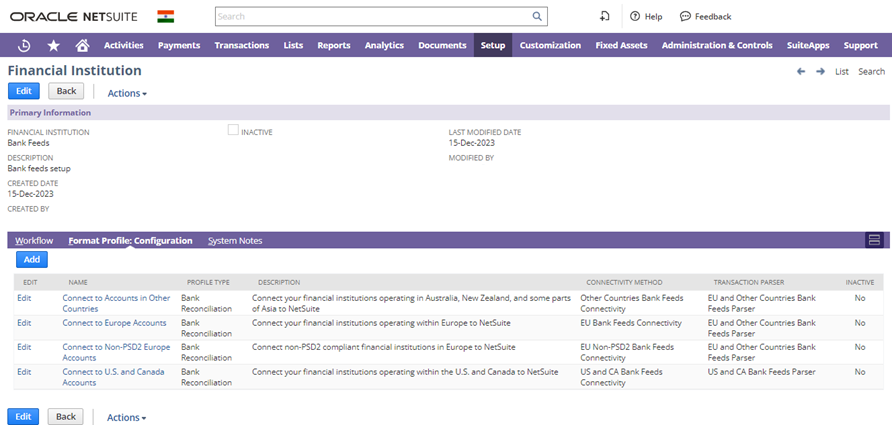
- Bank Feeds – An automatically installed, locked financial institution record that is not editable.
To access the preinstalled records, Navigate to Setup > Accounting > Financial Institution > List.
To set up your bank feeds, connect your NetSuite account to your financial institution using an authorized Account Information Service Provider (AISP). Once the connection is successfully established, all bank and credit card accounts linked to your financial institution will automatically connect with your NetSuite account.
Step 4: Link Bank Accounts
Configure a Format Profile to automate bank data imports that enables to connect to financial institutions to retrieve financial data.
Follow the step-by-step process to create a connection: -
- Go to Setup > Accounting > Financial Institution > List > View > Format Profile: Configuration > Connect to US and Canada Accounts > Edit
- Click Edit > Connectivity Configuration > Connect New Institution
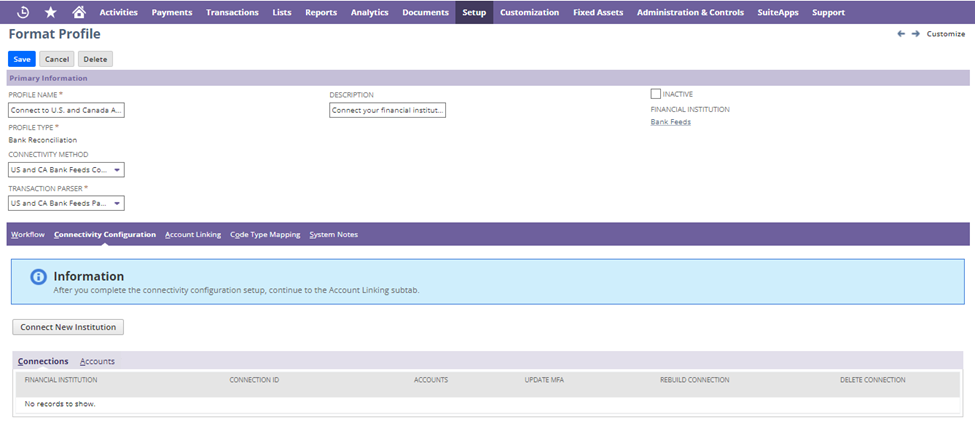
- A pop-up window will come, select your bank from the list of Banks supported by the financial institution.

- Give the bank account credentials, and setup the configuration and click Save and Finish.
- All active financial institution connections are listed under the Connections subtab, while all connected bank and credit card accounts are listed under the Accounts subtab.
- Navigate to the Account Linking Subtab to link bank account with the associated GL account in NetSuite. Select a bank or credit card account in NetSuite that you want to link to the adjacent bank accounts from each Linked GL Account dropdown list.
Methods to Import the Bank Statements
- Automated Bank Data Import for Bank Feeds (Connect to Financial Institution):
- Once a Bank is linked, the SuiteApp uses the Financial Institution Connectivity Plug-in to perform an automated process to retrieve bank data and import them into NetSuite account.
- After a format profile is saved for the first time:
- NetSuite initiates the download of the last 60 calendar days of available bank data from the financial institution into NetSuite.
- A daily schedule is created to import the data automatically from the financial institution into our accounts on the Match Bank Data page and if the import is unsuccessful, NetSuite requests data beginning from the last successful update and includes the previous seven calendar days.
To track the import status, go to the Banking Import History page.
Transactions > Bank > Banking Import History
- Manual Import:
- Manual bank statements include importing data using default parsers.
- To initiate a reconciliation, manually import a financial statement file downloaded from your financial institution into NetSuite.
- For manual import parser is not needed.
- Supported File types for Manual Import - CSV, OFX, QFX, BAI2, or CAMT.053.
- For manual import, Download the CSV template and upload using a CSV file.
To import a File manually Navigate to Banking Import History > Upload File > Track Status
Example CSV file format:

Matching Bank Data
Upon the successful import of the bank statement, the Intelligent Transaction Matching feature in NetSuite automatically compares the imported bank lines with existing account transactions in NetSuite.
- Auto-Matching: NetSuite’s intelligent algorithms will automatically match transactions based on date, amount, and description.
- Manual Matching: For transactions that aren’t auto matched, we can manually match them by selecting the corresponding entries in the system.
To match imported bank lines with account transactions, go to Transactions > Bank > Match Bank Data
- In the Account list, select the bank or credit card account for which we want to perform matching. Imported Bank Data and Account Transactions for the selected account are displayed then.
- Go to the Imported Bank Data grid in the To Be Matched subtab to view the list of imported bank lines for the account that requires matching.
- The imported bank lines are displayed in the left panel, and corresponding account transactions in the right panel that requires manual matching for the selected account.
- On the 'To Be Matched' subtab, select one or multiple items from the Imported Bank Data grid and then choose corresponding items from the Account Transactions grid to match them.
- Click Review subtab to view the automatically matched account transactions against the imported data.
Review the details listed below in the To Be Matched and Review subtabs to ensure the accuracy of your imported account statement:
- Date – Represents the date on which the transaction occurred and if not present in the imported file, it displays the posting date.
- Type – Specifies the transaction type, such as Check, Payment, Deposit, and Interest.
- Tran No. – The transaction ID.
- Name – Represents the name of the merchant or payee.
- Memo – The memo for the transaction.
- Amount – The transaction amount.
Click the Excluded subtab to display the imported data that has been excluded, including duplicate bank lines.
- The selected transactions are displayed in the bottom section, updating the amount difference in the ‘Difference’ To match, the variance between the selected imported bank line items and account transactions must be zero.
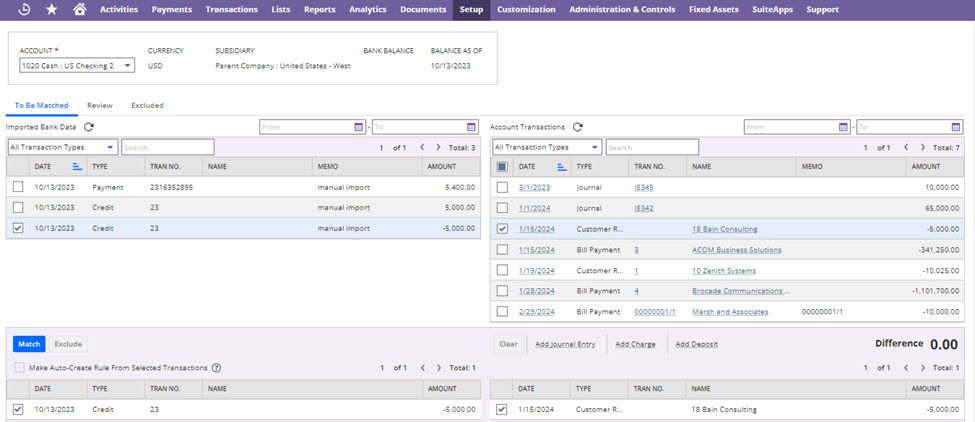
Note: If the Make Auto-Create Rule from Selected Transactions box is active, the system creates an auto-create rule and the next time reconciliation rules are run, NetSuite automatically creates corresponding transactions from imported bank lines that meet specific criteria and matches them accordingly.
Reconcile Account Statement
After matching all transactions and verifying, you can finalize the reconciliation. This step ensures that all transactions have been accounted for and that the financial records are accurate.
- Navigate to the Reconcile Account Statement page to review submitted transactions and include or exclude transactions from the reconciliation.
- Enter the Statement End Date and Closing Statement Balance, then submit for reconciliation.
- Confirm that the ending balance aligns with the bank statement.

ABSI (Auto Bank Statement Import)
Alongside the Bank Feeds SuiteApp, NetSuite also provides the Auto Bank Statement Import (ABSI) feature. ABSI automates the process of importing bank statements from your financial institutions directly into NetSuite. ABSI automatically imports bank statements at regular intervals, ensuring that your financial data is always current.
Here's how ABSI imports bank statements to NetSuite:
- Auto Bank Statement Import (ABSI) SuiteApp requires an SFTP connection to link to the bank.
- Setting up this connection involves providing SFTP server credentials and import file details.
Conclusion
The NetSuite bank reconciliation process is a powerful tool that helps businesses maintain financial accuracy, detect fraud, and ensure compliance with financial regulations. By following the steps outlined in this guide, meeting the prerequisites for the Bank Feeds SuiteApp, you can streamline your reconciliation process and enhance your financial management capabilities. Regular and accurate bank reconciliation provides the financial clarity needed to make informed business decisions.
Why Choose Blueflame Labs for NetSuite Bank Reconciliation?
Blueflame Labs offers expert NetSuite implementation and consulting services, including seamless bank reconciliation setup and optimization. Our team of certified professionals can help you:
- Accelerate Implementation: Quickly set up and configure the Bank Feeds SuiteApp.
- Optimize Processes: Streamline your bank reconciliation workflow for maximum efficiency.
- Ensure Data Accuracy: Maintain clean and reliable financial data.
- Provide Ongoing Support: Offer continuous assistance and troubleshooting.
Let Blueflame Labs be your partner in achieving accurate and efficient financial management through NetSuite bank reconciliation. Contact us today to learn more about our services.
Recent Blogs

Mastering Amortization Flow in NetSuite
Read More
Demystifying Second-Generation Managed Packages (2GP) in Salesforce
Read More
NetSuite Advanced Revenue Management (Essential)
Read More
Mastering Shipment Tracking with Zenkraft (Bringg)
Read More
Integrating Form Titan with Salesforce
Read More
Leveraging Rootstock ERP for your Purchase Orders & Authorizations
Read More
Master Google Tag Manager & Google Analytics 4
Read More
Step-by-Step Guide to Salesforce Data Migration
Read More
 Strictly Necessary Cookies